For AgentX to collect and analyze Windows or Debian Linux logs, AgentX Manager and AgentXKB must be initially configured. This configuration involves defining log sources and parameters such as log handling rules and retention policies, using either default pre-configured templates or creating new ones for log collection, and specifying the operational mode that is selecting between standalone or distributed modes to suit the organization’s infrastructure requirements. Additionally, it includes defining compiled normalizers, dashboards, and search templates for log normalization, analysis, and security monitoring purposes.
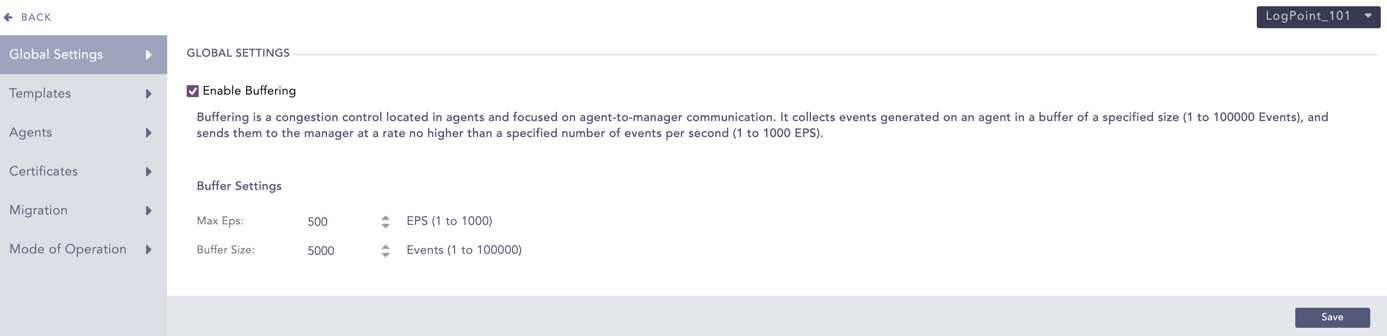
You can specify how logs should be handled by AgentX in Global Settings.
To configure Global Settings:
Go to Settings >> Configuration from the navigation bar and click AgentX.
Click Global Settings.
Select Enable Buffering to configure settings for congestion control and flooding of incoming logs.
In Max EPS, select the maximum number of logs AgentX can forward to Logpoint AgentX Manager in one second.
In Buffer Size, select the maximum number of logs AgentX can store in its memory.
Note
The specified max EPS must be smaller than the specified buffer size.
Click Submit.
Global Settings
You can configure AgentX by either using the default pre-configured templates or creating new ones. These templates are then added in Logpoint AgentX Manager while Configuring AgentX in Device to collect logs from Windows or Linux. AgentX only collects logs from what is configured while creating the template.
The pre-configured templates are:
default_linux: It fetches file collection and file integrity scanner logs of Debian Linux.
default_windows: It fetches event log, file collection, file integrity scanner and registry scanner logs of Windows.
lp_baseline_windows_workstation: It fetches logs from the following sources of Windows:
Security
Application
System
PowerShell
Sysmon
Microsoft Defender
The logs can then be used to detect threats, including but not limited to malicious PowerShell execution and suspicious process creations.
These default templates only collect logs that are newline separated.
To collect multiline logs using default templates:
Go to Settings >> Configuration from the navigation bar and click AgentX.
Click Templates.
Click the template name, select Is Multiline? and click Save.
To create new templates:
Go to Settings >> Configuration from the navigation bar and click AgentX.
Click Templates.
Click ADD.
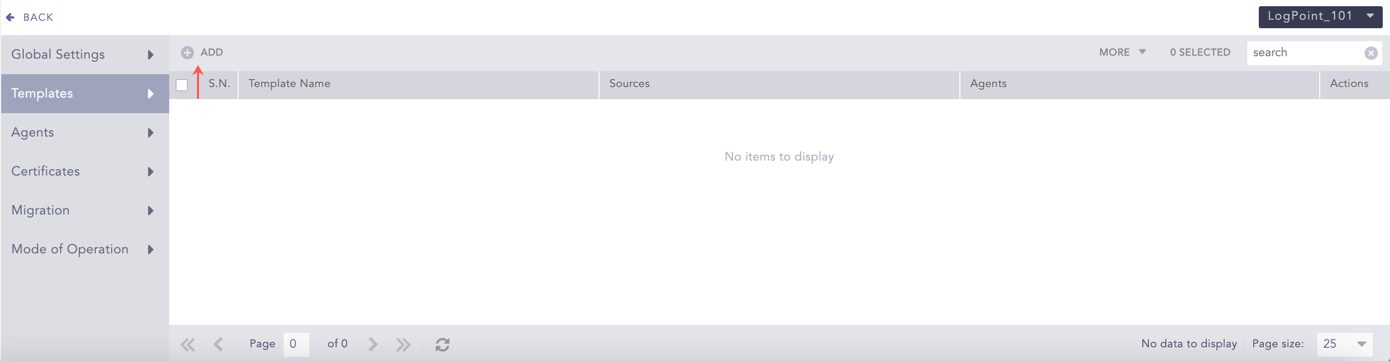
Templates
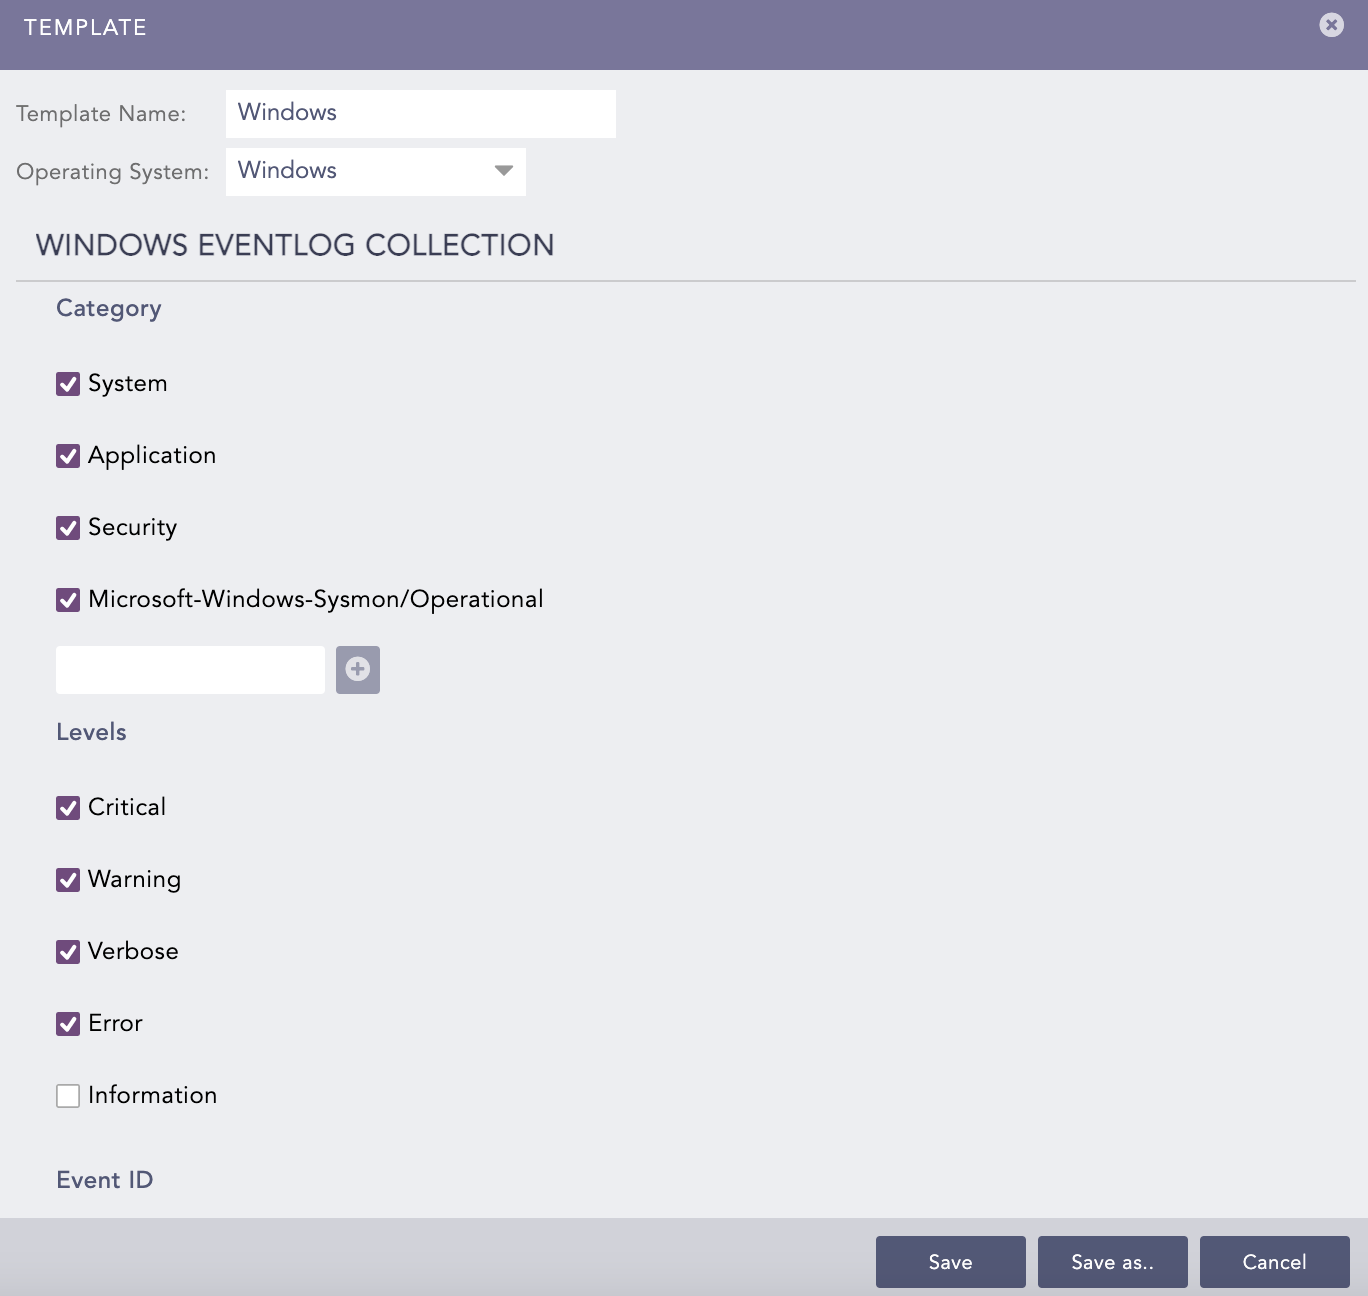
Enter a Template Name.
Select an Operating System.
5.1. Select Windows to add configurations of Windows Eventlog Collection, File Collection, File Integrity Scanner and Windows Registry Scanner sources to the template.
5.2. Select Linux to add configurations of File Collection and File Integrity Scanner sources to the template.
Windows Eventlog Collection allows you to define the type of event logs to collect from Windows.
To configure Windows Eventlog Collection:
Select the Category of Windows events that AgentX should collect. You can also manually create a Category using Add.
Select the severity Levels of the event log. Levels are used to group logs and indicate their severity or verbosity.
Enter the Event ID of the event. This Windows identification number helps network administrators uniquely identify a specific log. Leave this field empty to collect all the events from the selected category.
Click Save to save your configurations in the current template, or click Save As to save the configuration with a different template name. You can also Cancel the template configuration process.
You can also include or exclude particular events from the log results by entering the event ID of the event and clicking Include or Exclude. While you can include and exclude up to 800 event IDs (include 400 and exclude 400), we recommend limiting the total number to 220 to avoid potential performance issues on the agent.
Windows Eventlog Collection
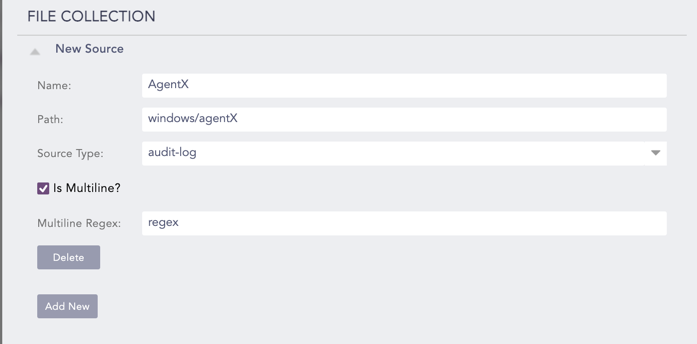
File Collection allows you to collect flat file logs of Windows or Linux.
To configure File Collection:
Enter the Name of the File Collection source.
Enter the Path of the file or directory. Make sure your files end with a newline. File Collection skips files that don’t end in a newline.
Select a Source Type to collect logs.
Select Is Multiline? if the source consists of multiline logs.
4.1. Enter a regex pattern that matches the start of the log in Multiline Regex. If a matching regex pattern is found, AgentX treats subsequent lines as a single log until the following matching line is found or the end of the file is reached.
Note
If the matching regex pattern is not found, AgentX considers the whole file a single log, causing a performance issue. The provided regex pattern must match the starting lines in the file.
Click Save to save your configurations in the current template, or click Save As to save the configuration with a different template name. You can also Cancel the template configuration process.
You can add a new source for File Collection or remove an existing one using Add New and Delete.
File Collection
File Integrity Scanner allows you to collect logs generated after monitoring activity of Windows or Linux files and directories.
To configure File Integrity Scanner:
Enter the Name of the file or directory to scan.
In Include Path, enter the file or directory location. You can also include “*” and “?” wildcards instead of the file or directory name. For example, windows/logpoint/*/file.
In Exclude Path, enter the file or directory location to exclude while scanning.
Select the Schedule. A schedule is how frequently AgentX checks for changes in specified files and directories.
Note
If you are monitoring a directory with huge number of files, the schedule should not be frequent.
In Recursion, select a level to define how deep the scanner can go inside the directory.
Click Save to save your configurations in the current template, or click Save As to save the configuration with a different template name. You can also Cancel the template configuration process.
You can add a new source for File Integrity Scanner or remove an existing one using Add New and Delete.

File Integrity Scanner
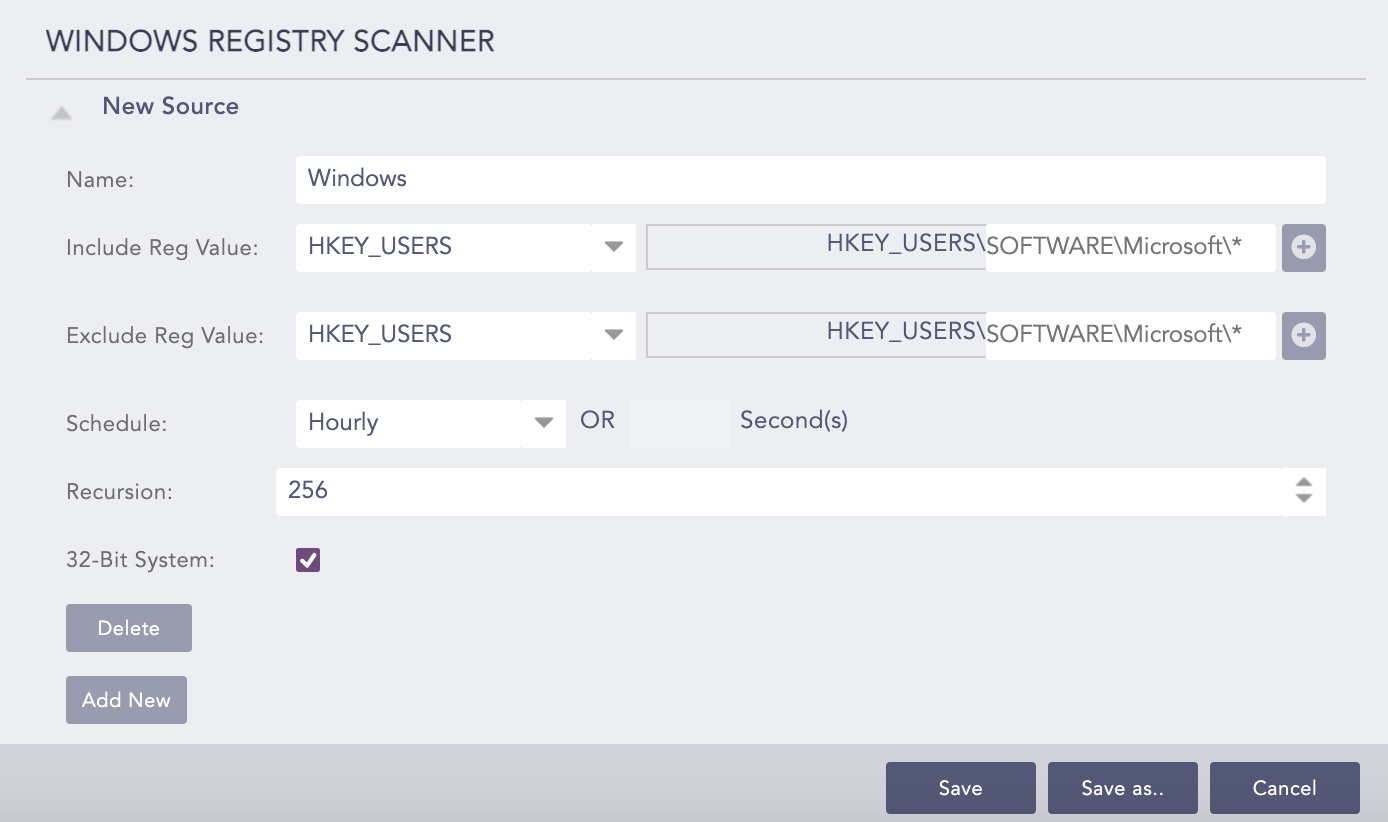
Windows Registry Scanner allows you to collect event records logs generated after scanning Windows registry.
To configure Windows Registry Scanner:
Enter a Name for the source.
In Include Reg Value, select the root key of Windows registry and enter its location. Click the + icon to add multiple locations.
In Exclude Reg Value, select the root key of Windows registry to exclude while scanning and enter its location. Click the + icon to add multiple locations.
In Schedule, define how frequently AgentX should scan the registry.
In Recursion, select a level to define how deep the scanner can go inside the registry.
Enable the 32-Bit System to scan registries of 32-bit Windows.
Click Save to save your configurations in the current template, or click Save As to save the configuration with a different template name. You can also Cancel the template configuration process.
You can add a new source for Windows Registry Scanner or remove an existing one using Add New and Delete.
Windows Registry Scanner
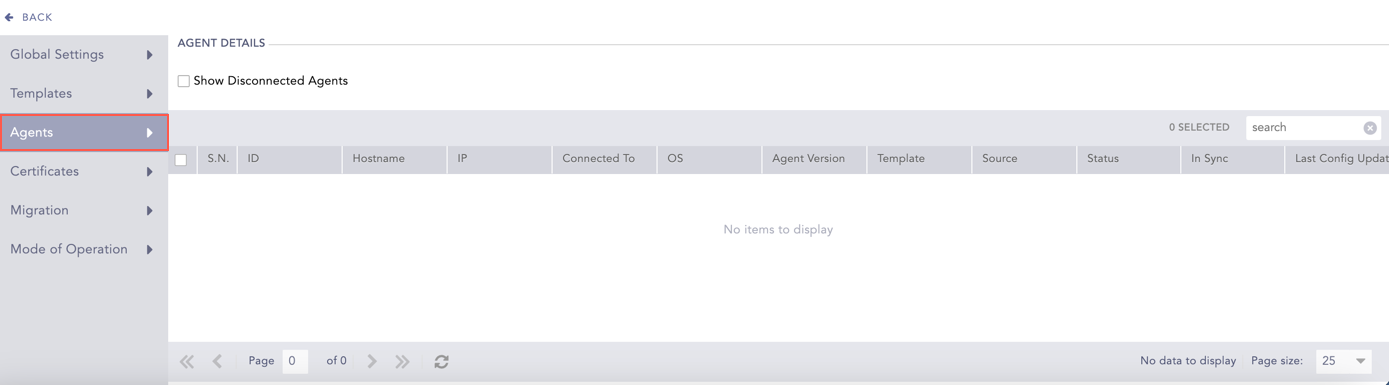
You can see the details of all the agents configured with AgentX in Agents. However, they must be connected at least once with AgentX to be listed here. The agents that were configured but disconnected now can also be displayed here by selecting Show Disconnected Agents.
Agents
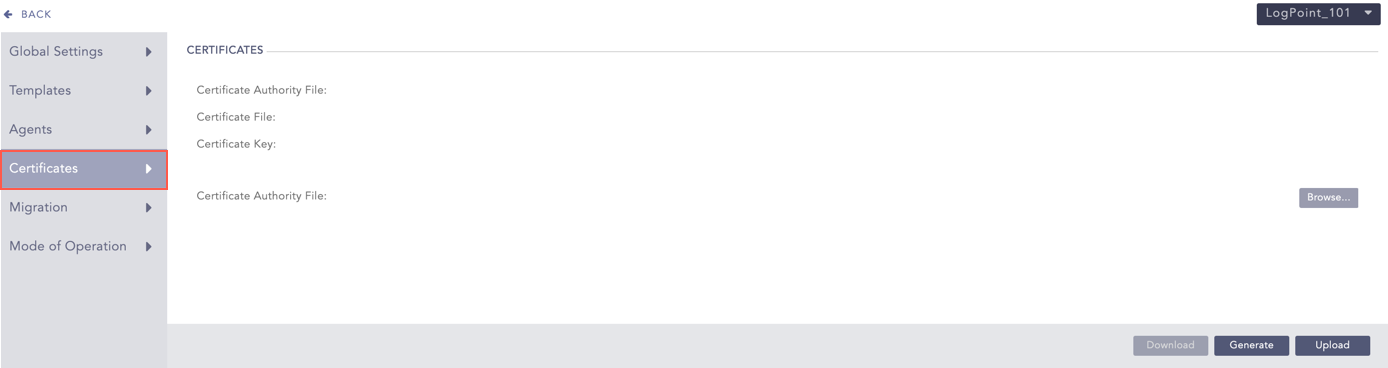
AgentX uses SSL certificates to verify that an agent is authorized to enroll in the manager. They are available in manager and agents by default after AgentX installation.
The certificates are:
rootCA.pem: rootCA.pem, also called the Root Certificate Authority (CA) certificate is used to validate the authenticity of agents during enrollment. It is stored on the AgentX manager.
sslagent.cert and sslagent.key: sslagent.cert and sslagent.key are used to authenticate the agent to the manager. They are stored on the agent.
These certificates are same for all AgentX clients. You can also generate certificates or upload ones that you already have.
Note
If you are using AgentX in a Distributed Logpoint setup or Distributed Mode, you only have to generate or upload certificates in the search head. AgentX will automatically sync them to all the Logpoints in that setup.
To generate or upload certificates:
Go to Settings >> Configuration from the navigation bar and click AgentX.
Click Certificates.
Click Generate to generate new certificates. Alternatively, to upload an already existing certificate, click Browse, select the certificate and click Upload.
Here, if you click Generate, AgentX generates the above three certificates. It syncs rootCA.pem automatically but sslagent.cert and sslagent.key must be downloaded by clicking Download. Then, you must replace the existing certificates in agents with them.
If you Upload, then you must upload rootCA.pem here and replace the existing certificates in agents with your sslagent.cert and sslagent.key.
In Windows, the location of existing certificates is C:\Program Files (×86)\ossec-agent\cert and in Linux, it is /opt/logpoint/ossec/cert.
Certificates
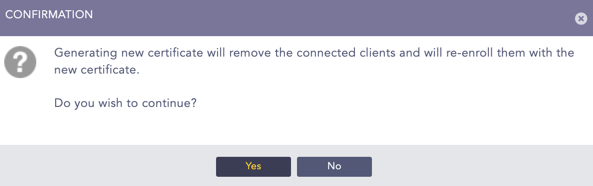
Click Yes in the CONFIRMATION warning to continue and click No to stop.
CONFIRMATION
Note
The new agents configured in AgentX manager after generating or uploading certificates still uses the old certificates that are present by default. So, you must go to the location of those certificates in agents and replace them with the newly generated or uploaded ones. The location is C:\Program Files (×86)\ossec-agent\cert in Windows, and in Linux, it is /opt/logpoint/ossec/cert.
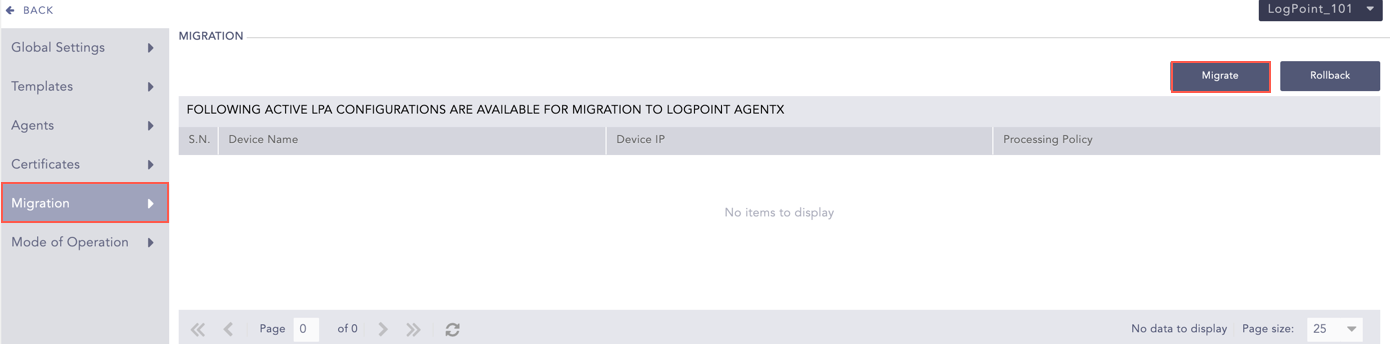
Migration enables you to move all configurations from Logpoint Agent to AgentX. However, the configurations can only be moved if at least one Windows device is configured in Logpoint Agent and the same device is not configured in AgentX. After the migration, you can use the Functions.
Note
After migration, the connection between Logpoint and Logpoint Agent will be broken. This means any logs that were in the queue for Logpoint Agent during the migration are not processed.
To migrate the configurations:
Install AgentX Client in Windows.
Configure AgentX in agents that have Logpoint Agent configurations and will be migrated.
Go to Settings >> Configuration from the navigation bar and click AgentX.
Click Migrate.
Migration
Click Yes to confirm.
On the left hand side, you can see the processing policies used for Logpoint Agent configuration. Replace it with AgentX compatible processing policies on the right hand side and click Proceed with Migration.
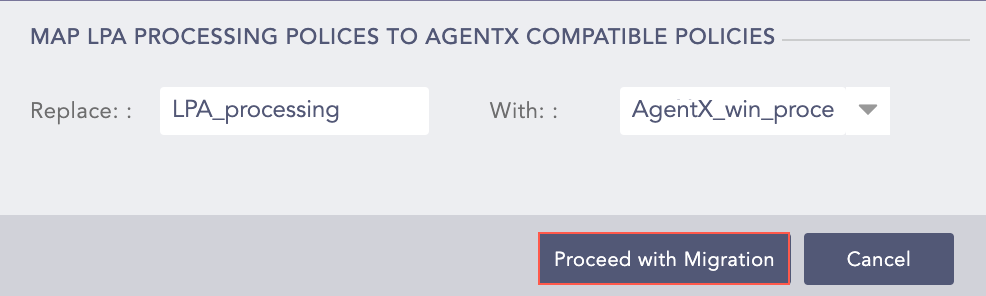
Proceed with Migration
Logpoint then confirms the migration is successfully completed.
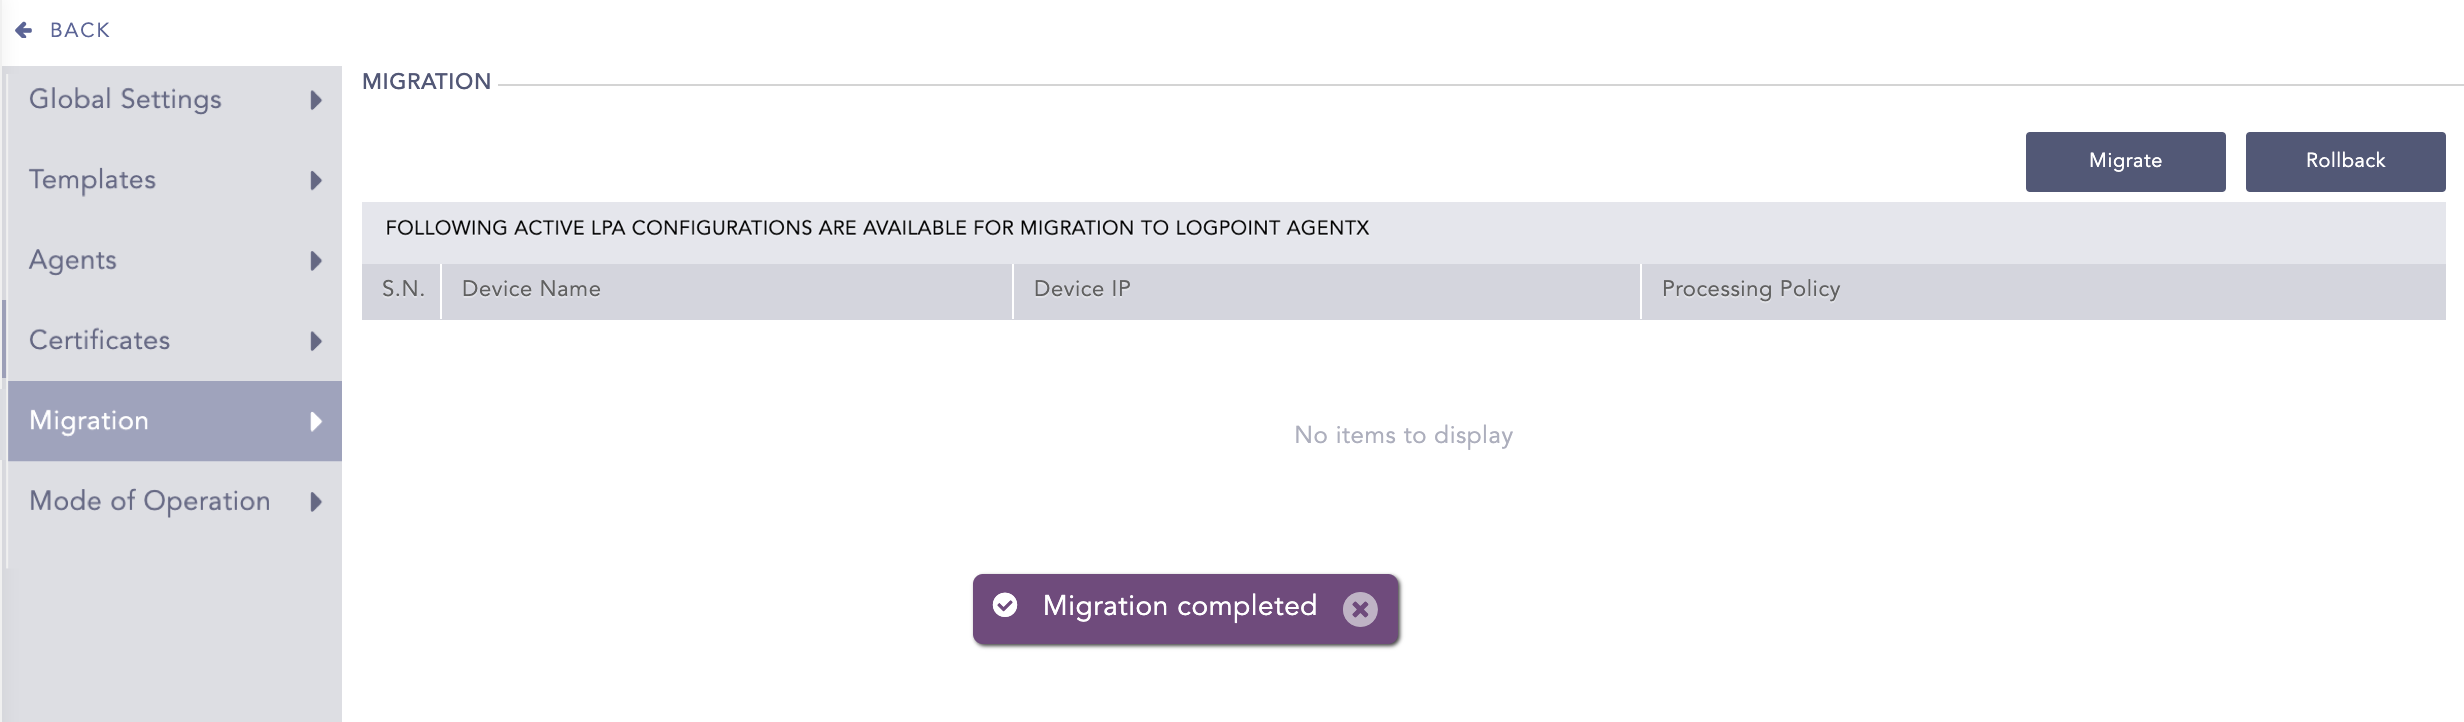
Migration Completed
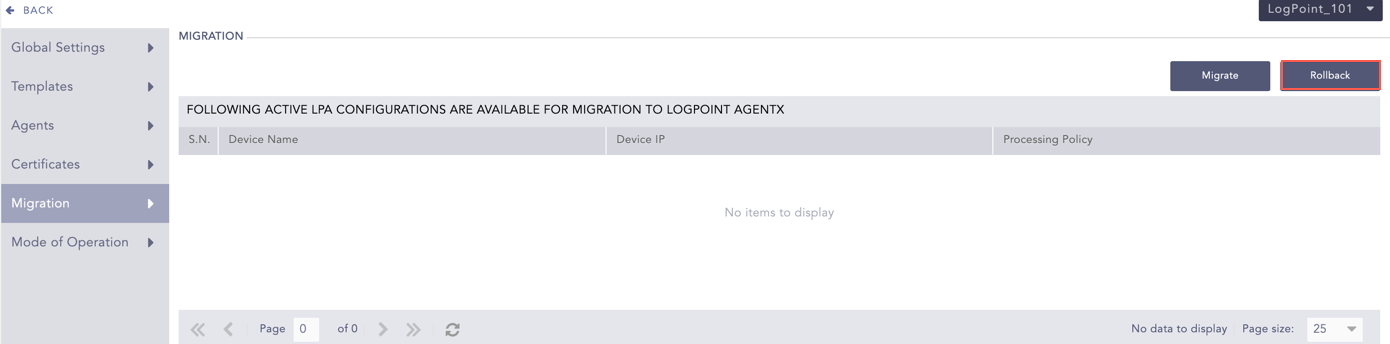
You can rollback the migration and revert the Logpoint device to its previous state using Rollback.
Important
If the device configurations are changed after the migration, it cannot be reverted.
To rollback the migration:
Install LogPoint Agent Collector.
Go to Settings >> Configuration from the navigation bar and click AgentX.
Click Rollback.
Rollback
Click Yes.
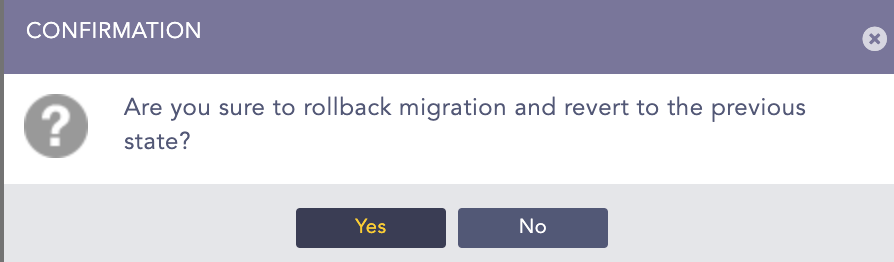
Rollback Migration
Logpoint then confirms the migration is successfully rolled back.
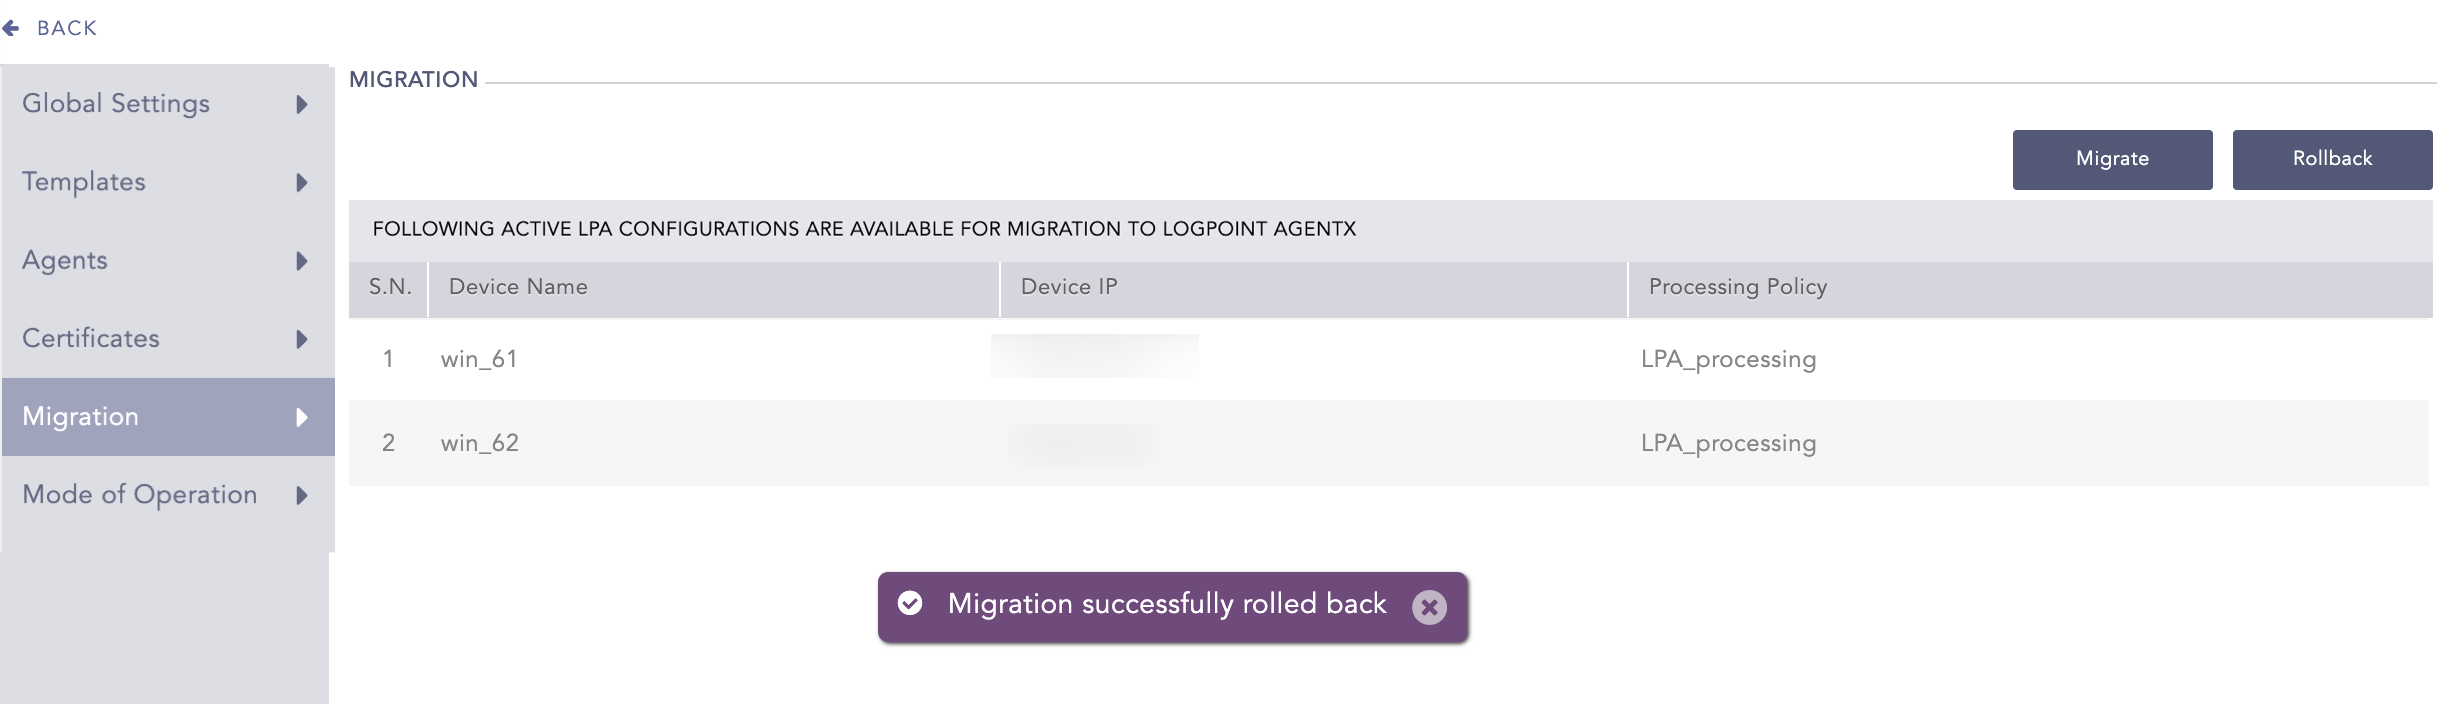
Rollback Completed
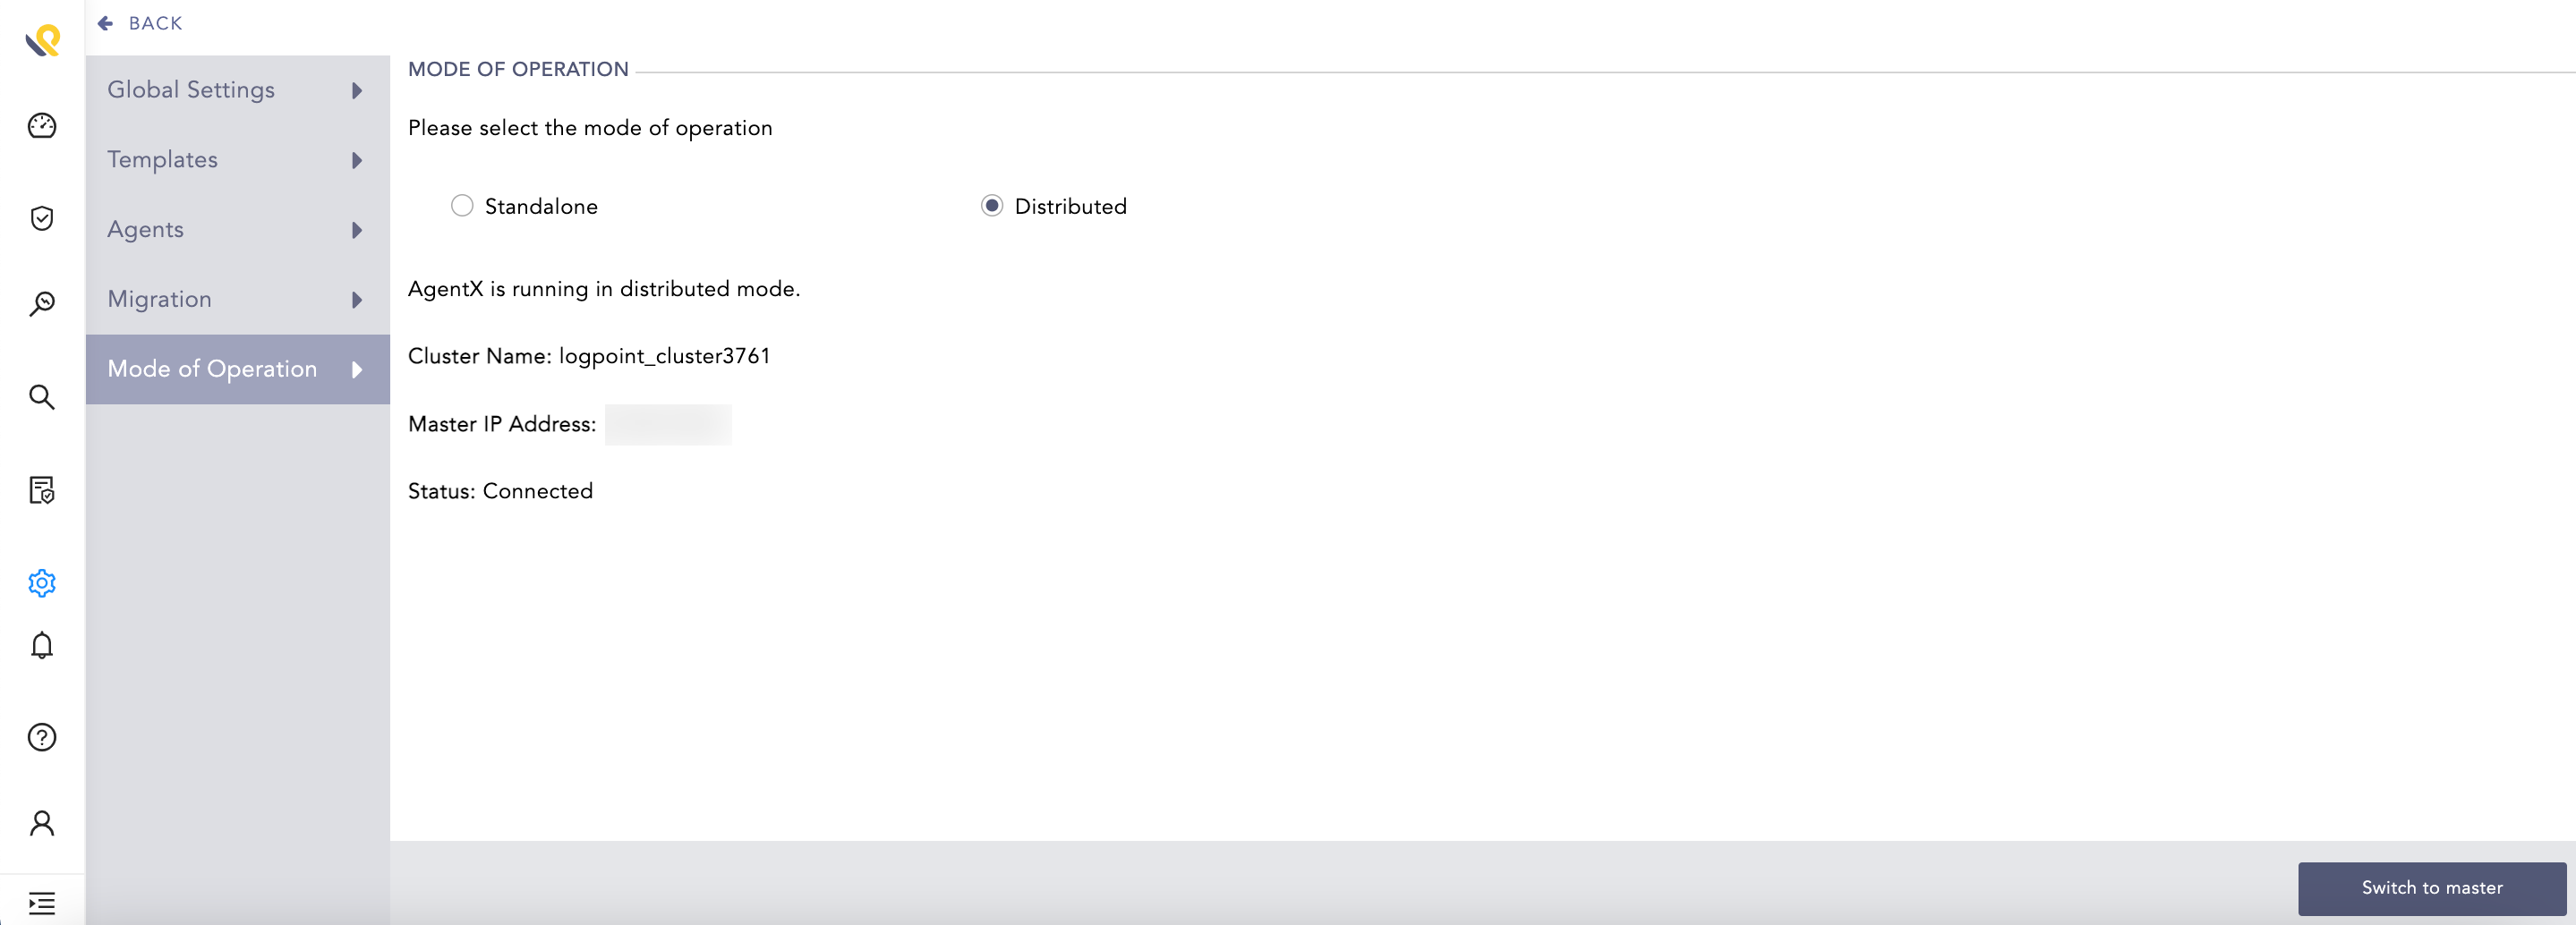
The mode of operation enables you to specify whether to operate AgentX in standalone mode or distributed mode.
The Standalone mode is the default mode of operation where AgentX is installed and configured in a single Logpoint. Here, the Logpoint is not connected to any Logpoint Collector and is not in the Distributed Logpoint setup. It is recommended to use this mode if log collection, storage and analysis are being done from a single Logpoint and the same Logpoint is used to execute automated response or SOAR commands.
The Distributed mode enables you to use AgentX in a cluster architecture. In this architecture, there are two types of nodes: master and worker. The master node adds Distributed Logpoints as worker nodes and executes automated response or SOAR commands on agents configured in those nodes. The worker nodes, on the other hand, are responsible for receiving and processing log data and executing automated response or SOAR commands on the configured agents.
Important
If a master node in the cluster architecture is down, it cannot send automated responses or SOAR commands on agents configured in distributed Logpoints. Also, new agents cannot be added to any Logpoints in the architecture.
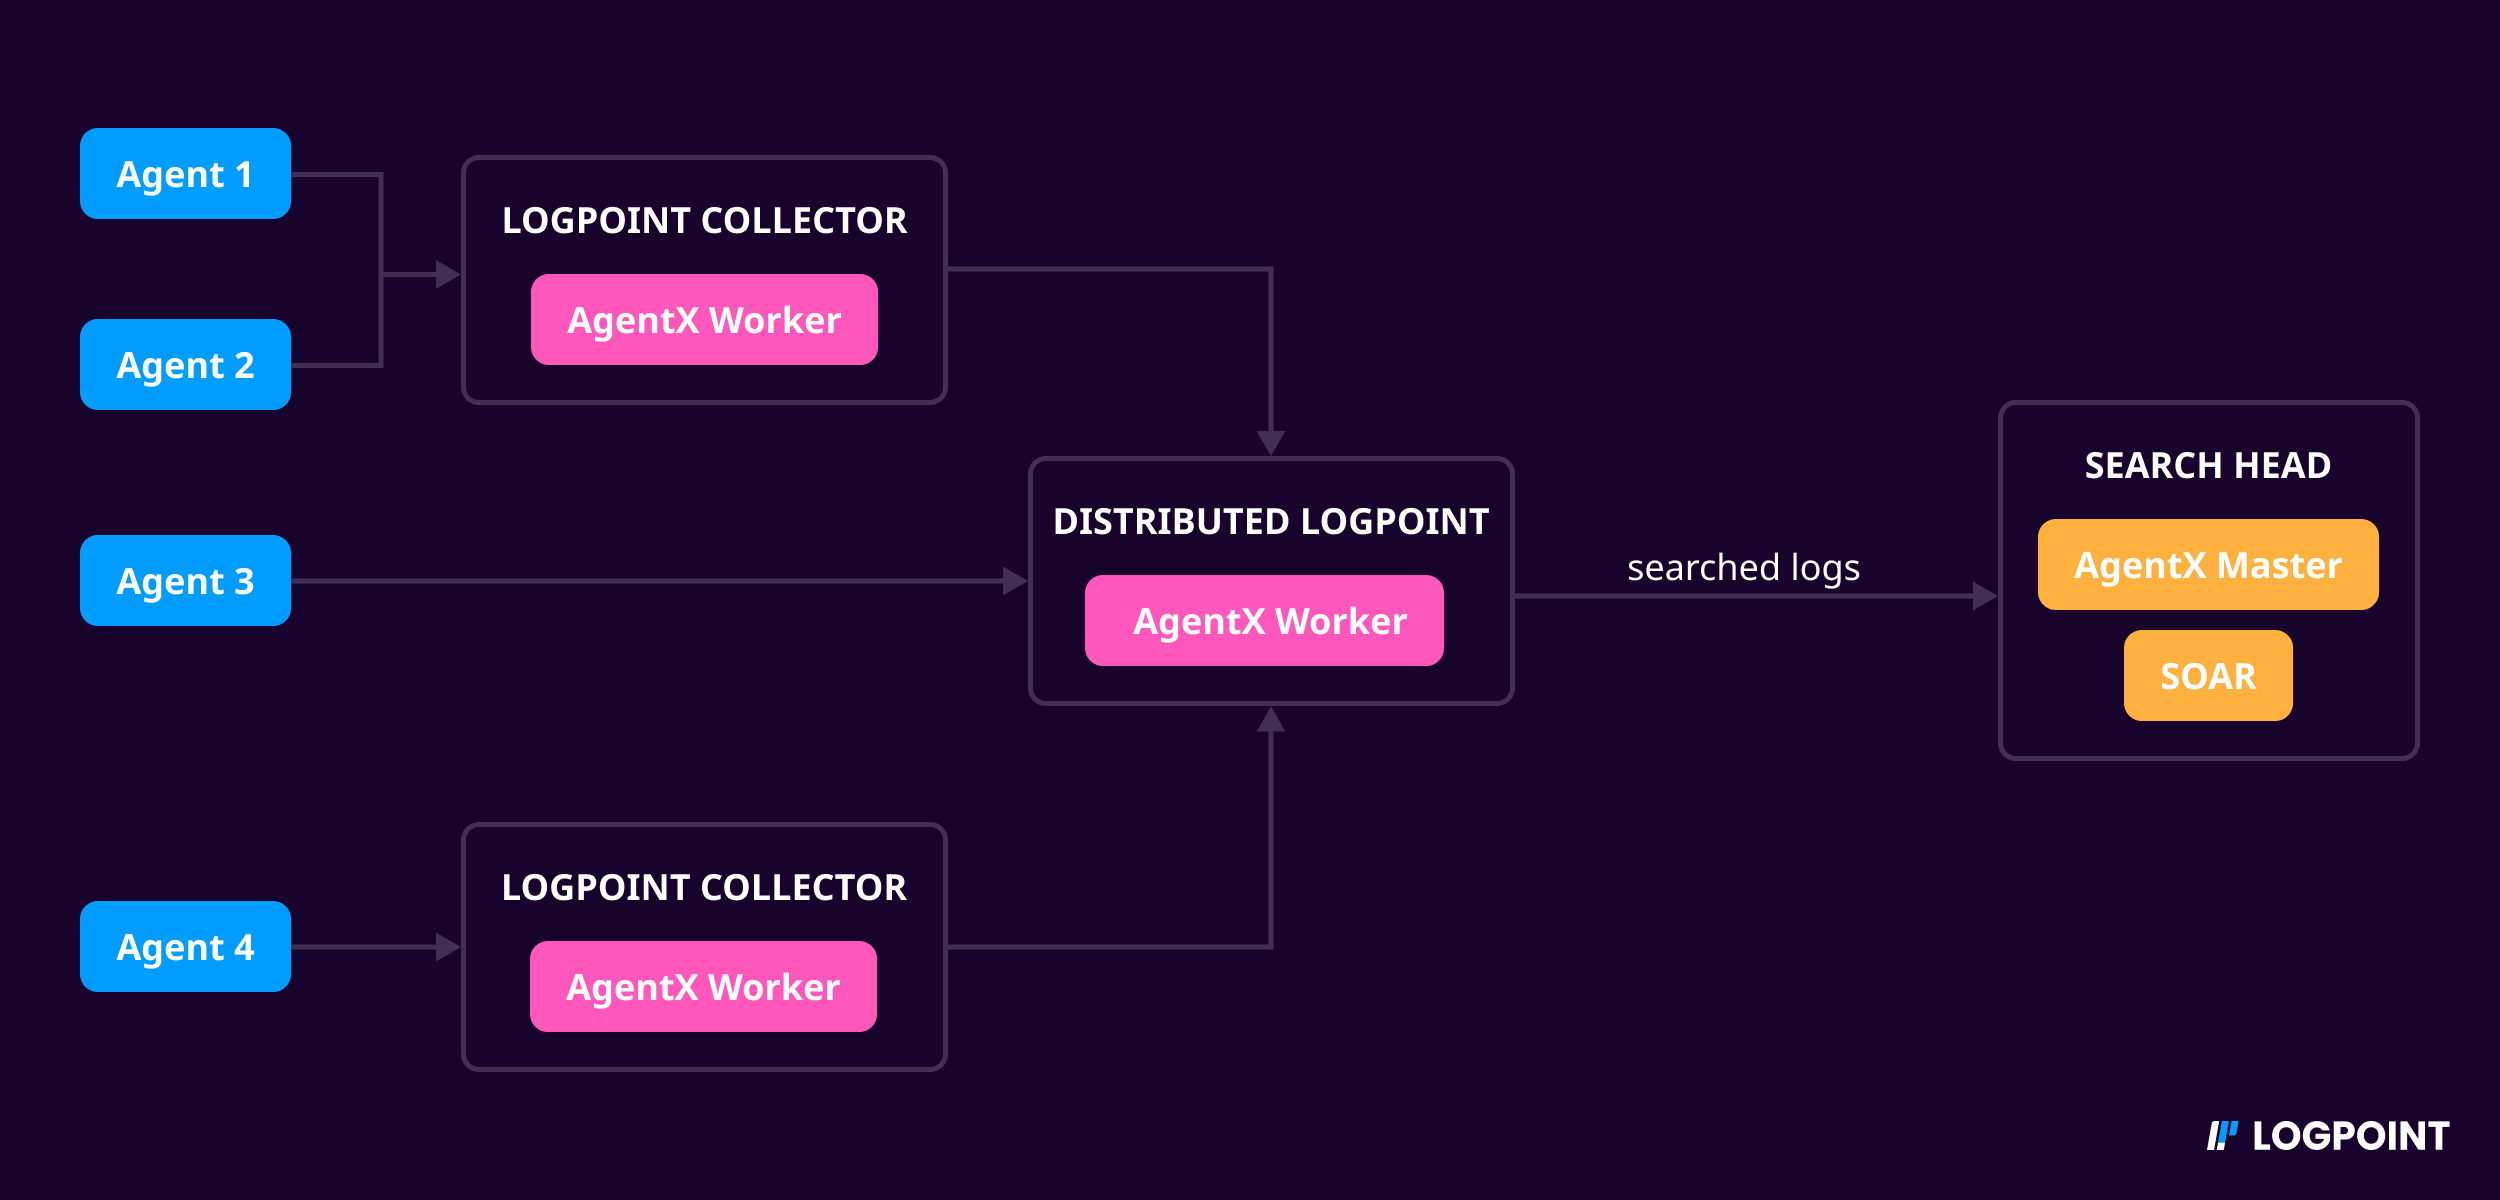
Distributed Mode Log Flow
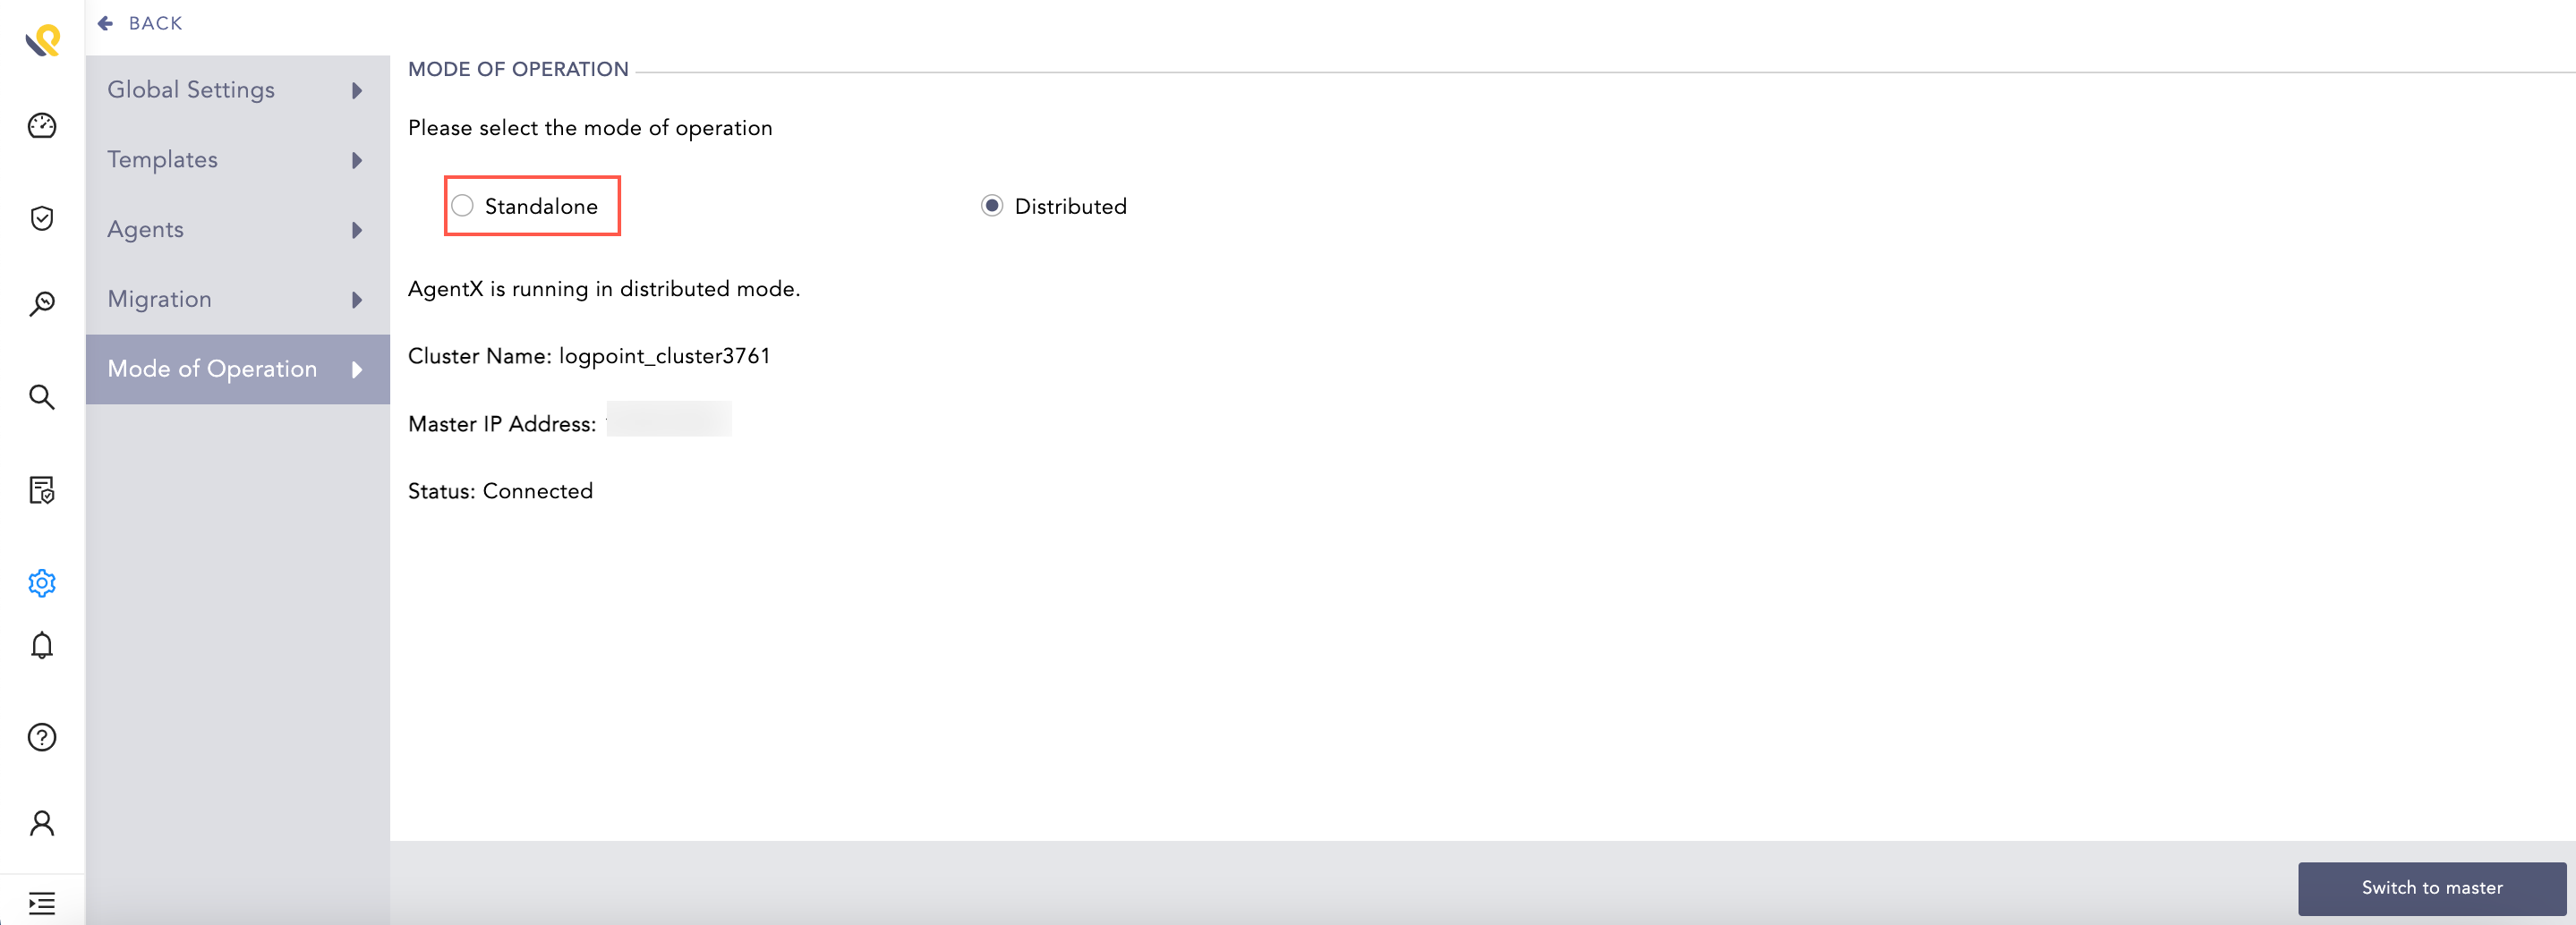
To configure the Distributed mode:
Go to Settings >> Configuration from the navigation bar and click AgentX.
Click Mode of Operation and select Distributed.
Click Yes.
Select the Distributed Logpoints and click Configure Cluster.
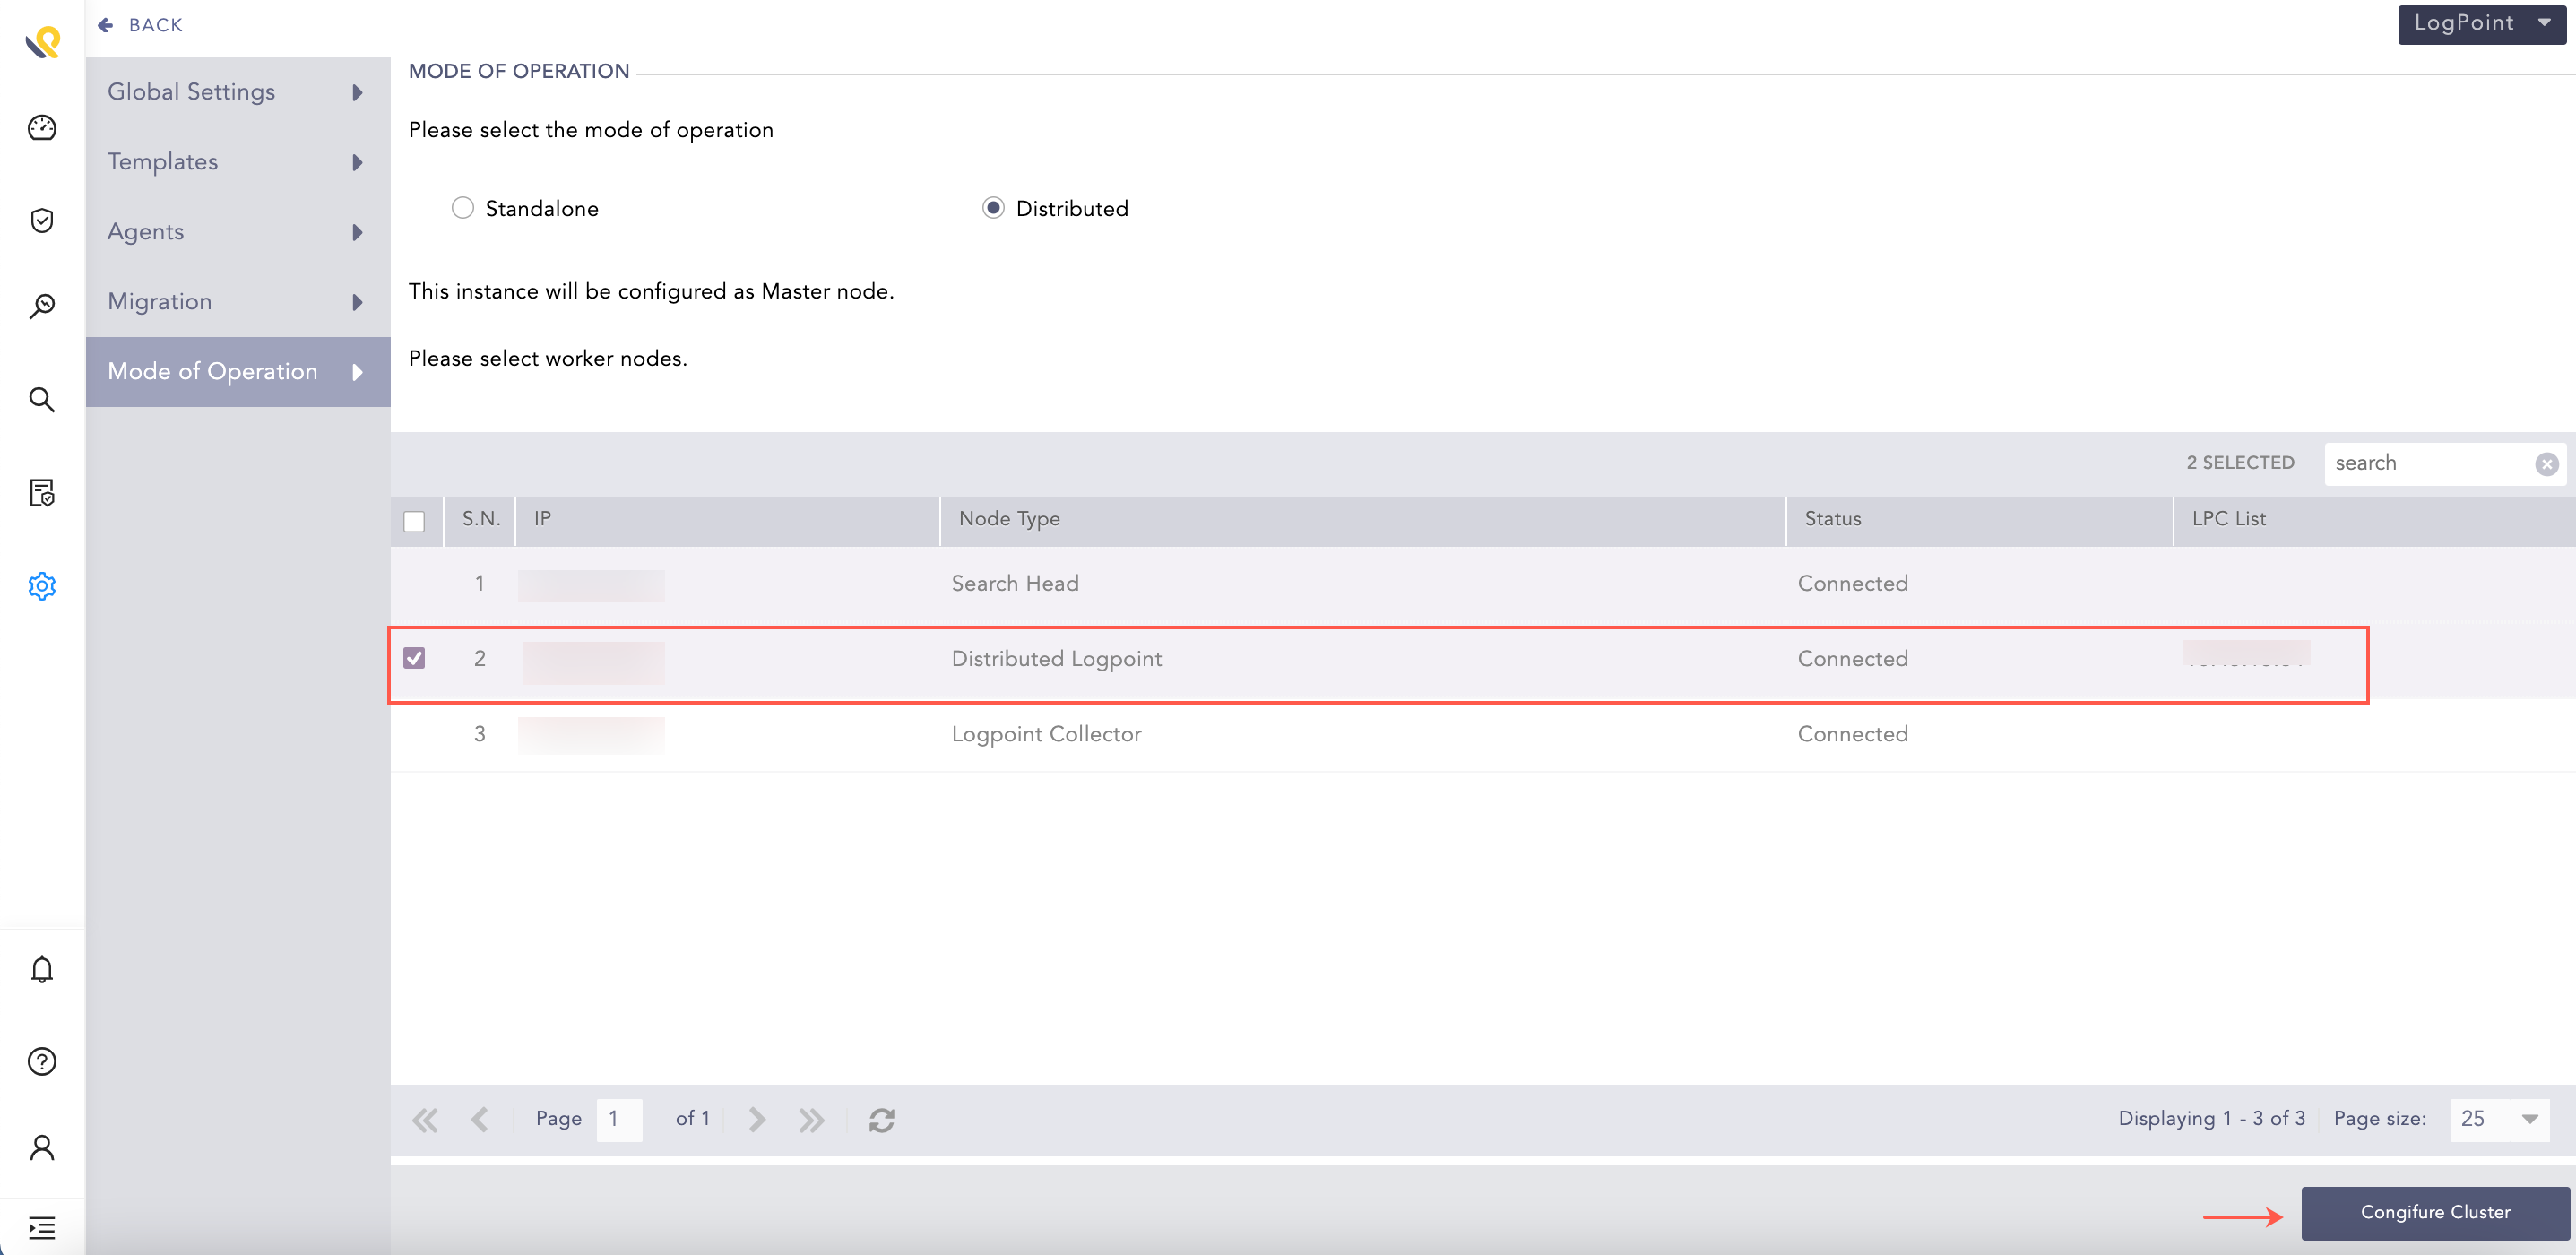
Configure Cluster
The Distributed Logpoints are now in the cluster architecture.
Distributed Logpoint
Note
The master and worker nodes can also be switched from distributed mode to standalone mode by clicking Standalone and Yes. This will disconnect and remove them from the cluster architecture.
Standalone
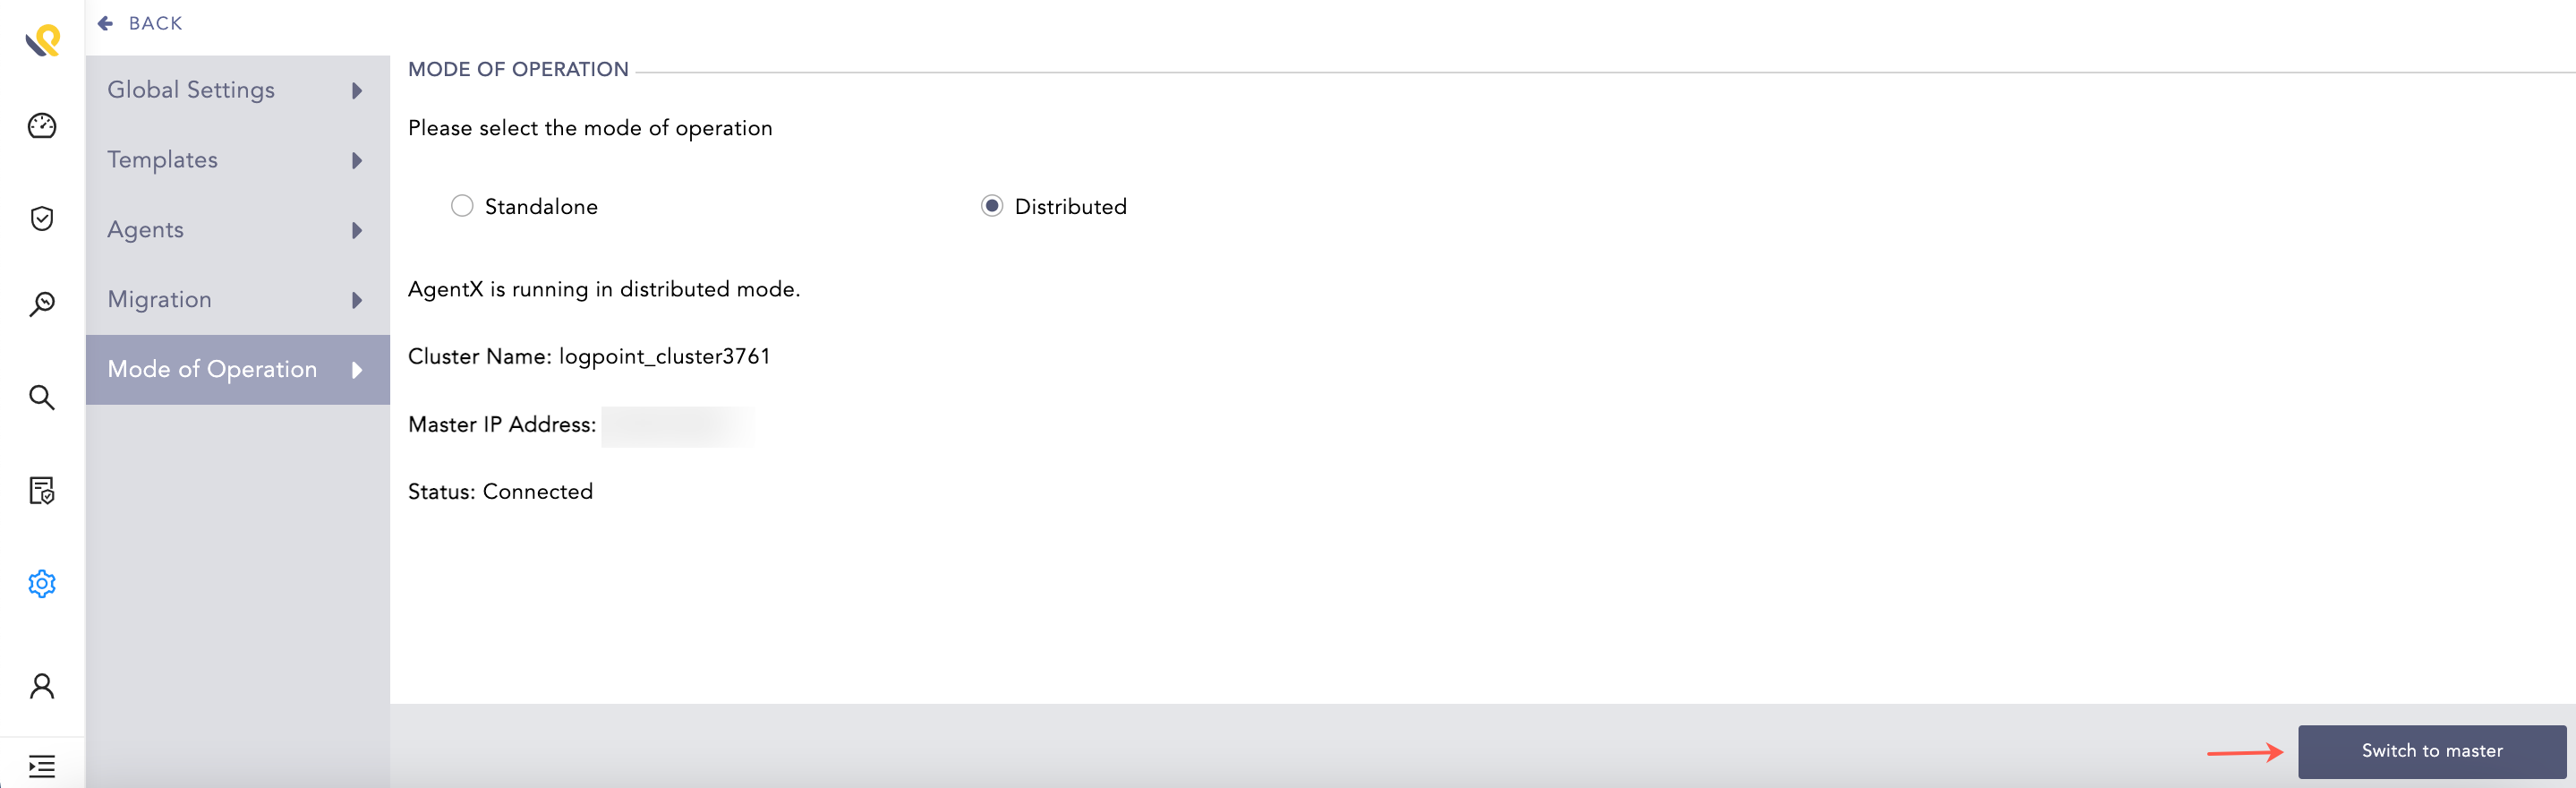
To convert worker node to master:
Go to Settings >> Configuration from the navigation bar and click AgentX.
Click Mode of Operation and click Switch to master.
Switch to Master
Click Yes.
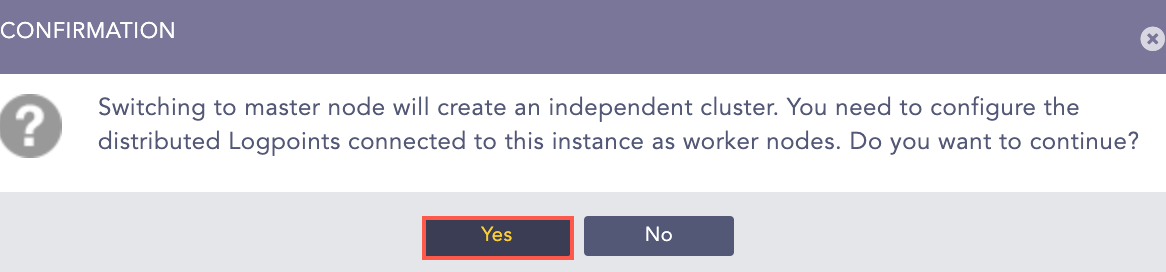
Switch to Master
Click Configure Cluster.
Note
We recommend you enable SOAR in the master node since all the logs collected in the cluster architecture can be accessed from there.
To enable SOAR:
Go to
Settings >> System Settingsfrom the navigation bar and click System Settings.Click General and select Enable SOAR in Logpoint.
Click Save.
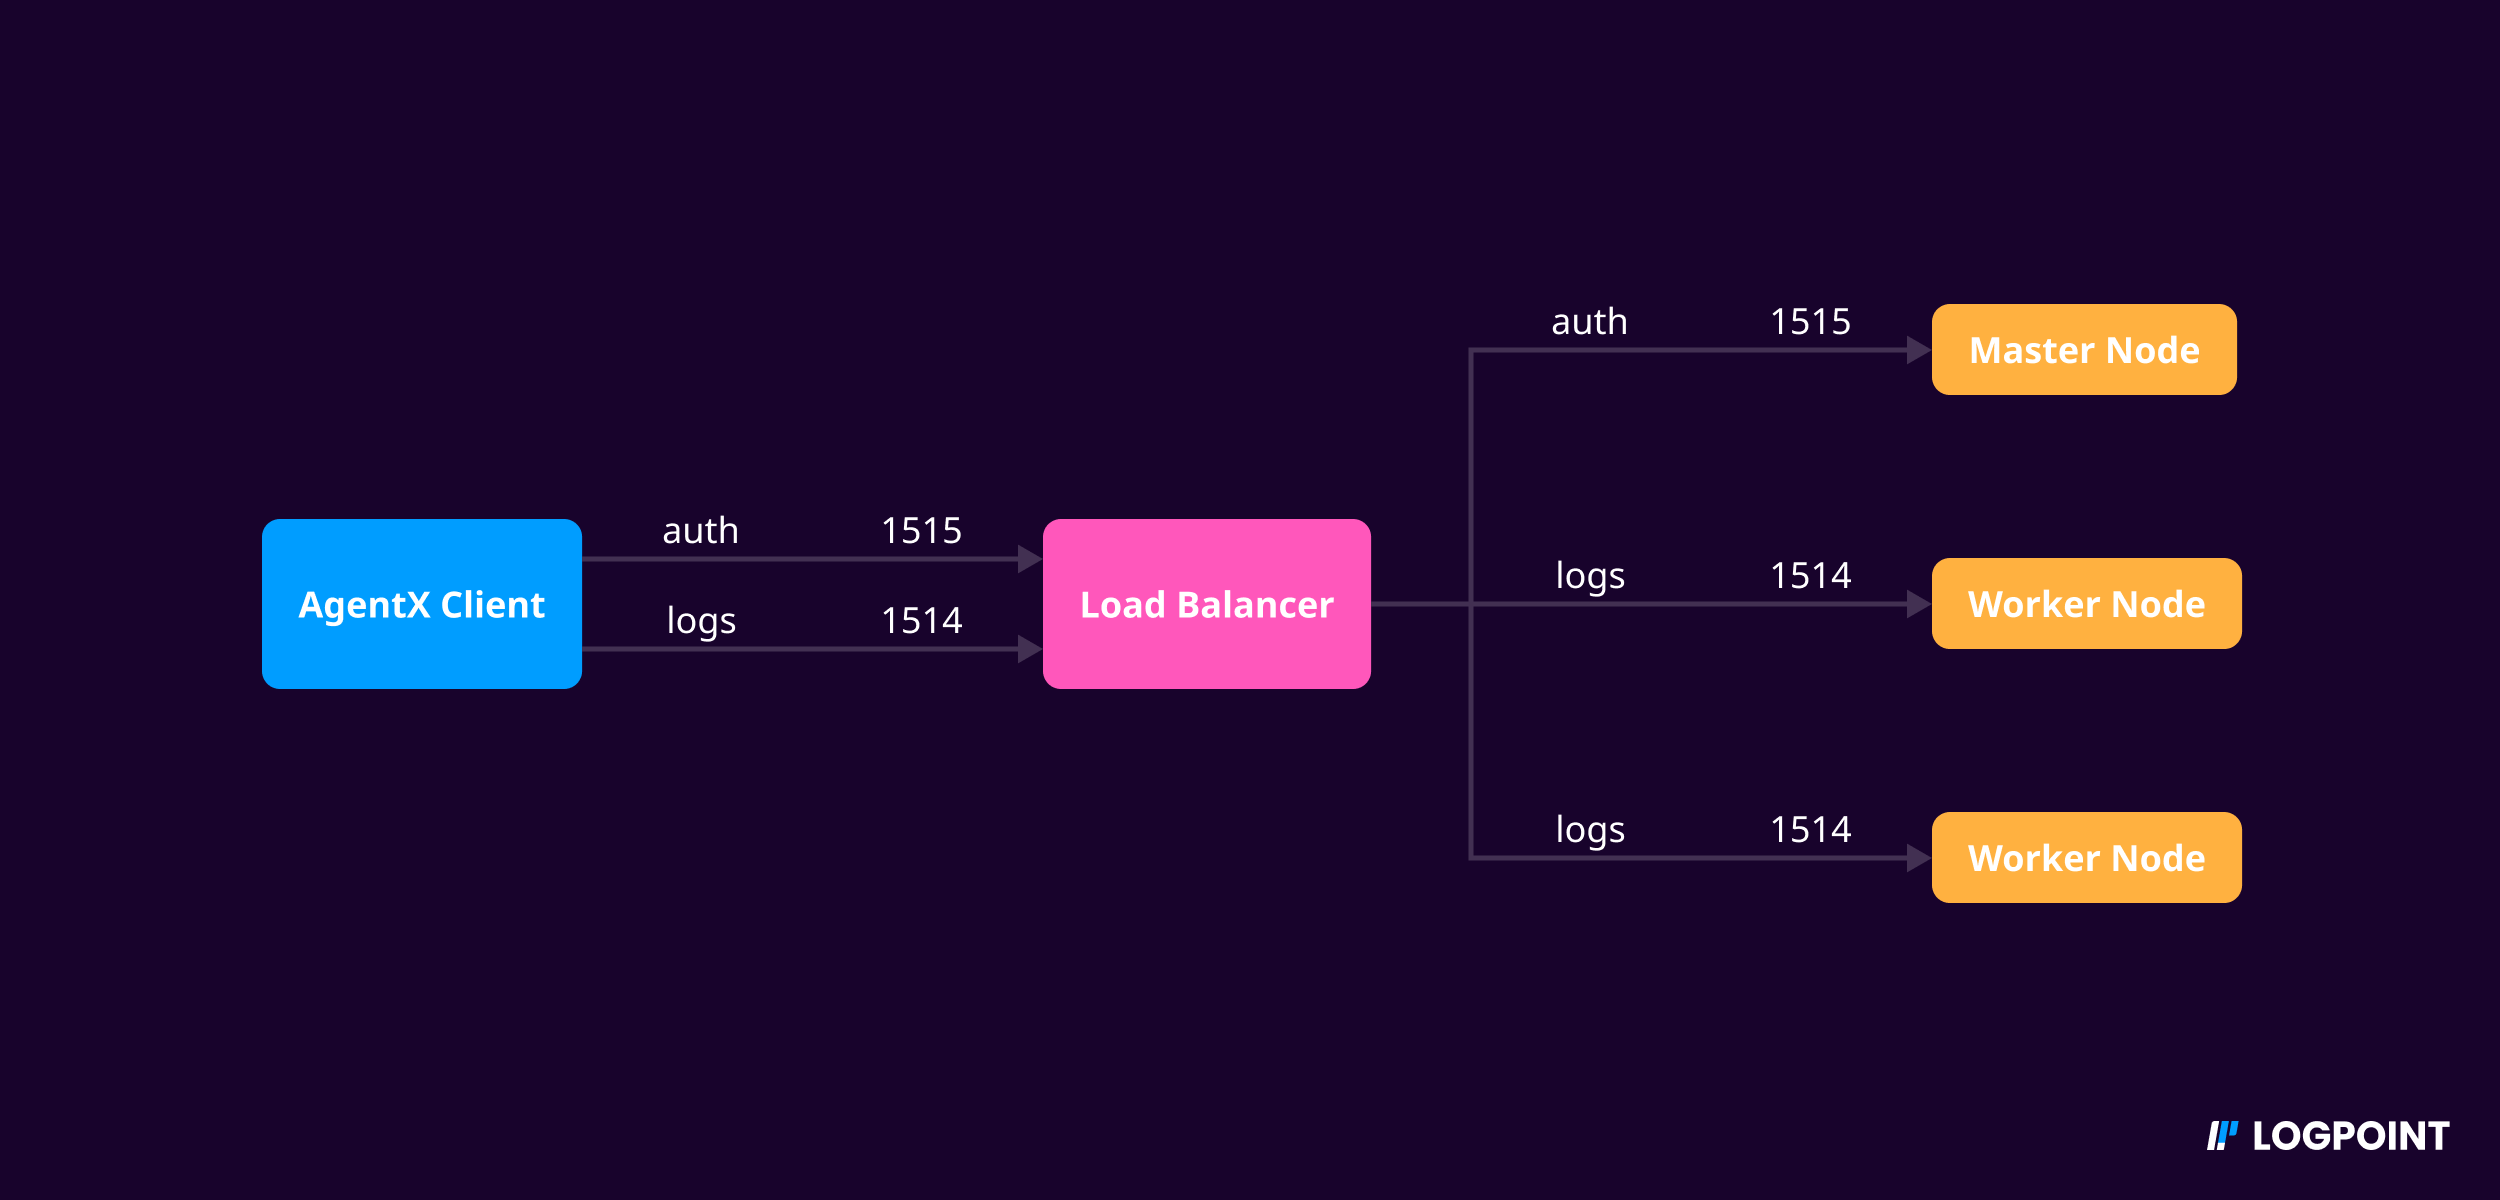
You can implement Load Balancer with AgentX cluster which automatically detects and handles failure across all nodes in that cluster architecture. If a node goes down or becomes unavailable, it redirects the incoming data to another available node. This helps to ensure that AgentX continues to function properly even in the event of a node failure.
To implement load balancer in AgentX:
Add your load balancer IP address while Adding Windows or Linux Device in Logpoint. This will grant the load balancer access to ports 1514 and 1515.
Open ports 1514 and 1515 in your load balancer.
Port Configurations in Load Balancer Environment
Configure your load balancer. For example, if you are using the Nginx load balancer, you can apply the following configuration:
stream {
  upstream cluster {
      hash $remote_addr consistent
      server <AgentX-WORKER1-IP>:1514;
      server <AgentX-WORKER2-IP>:1514;
  }
  upstream master {
      server <AgentX-MASTER-IP>:1515;
  }
  server {
      listen 1514;
      proxy_pass cluster;
  }
  server {
      listen 1515;
      proxy_pass master;
  }
}
Add load balancer IP address in the agent during installation of AgentX Client.
Go to Settings >> SOAR Settings from the navigation bar and click Playbook Integrations.
Search AgentX in Search Integration.
Click the ellipsis icon.
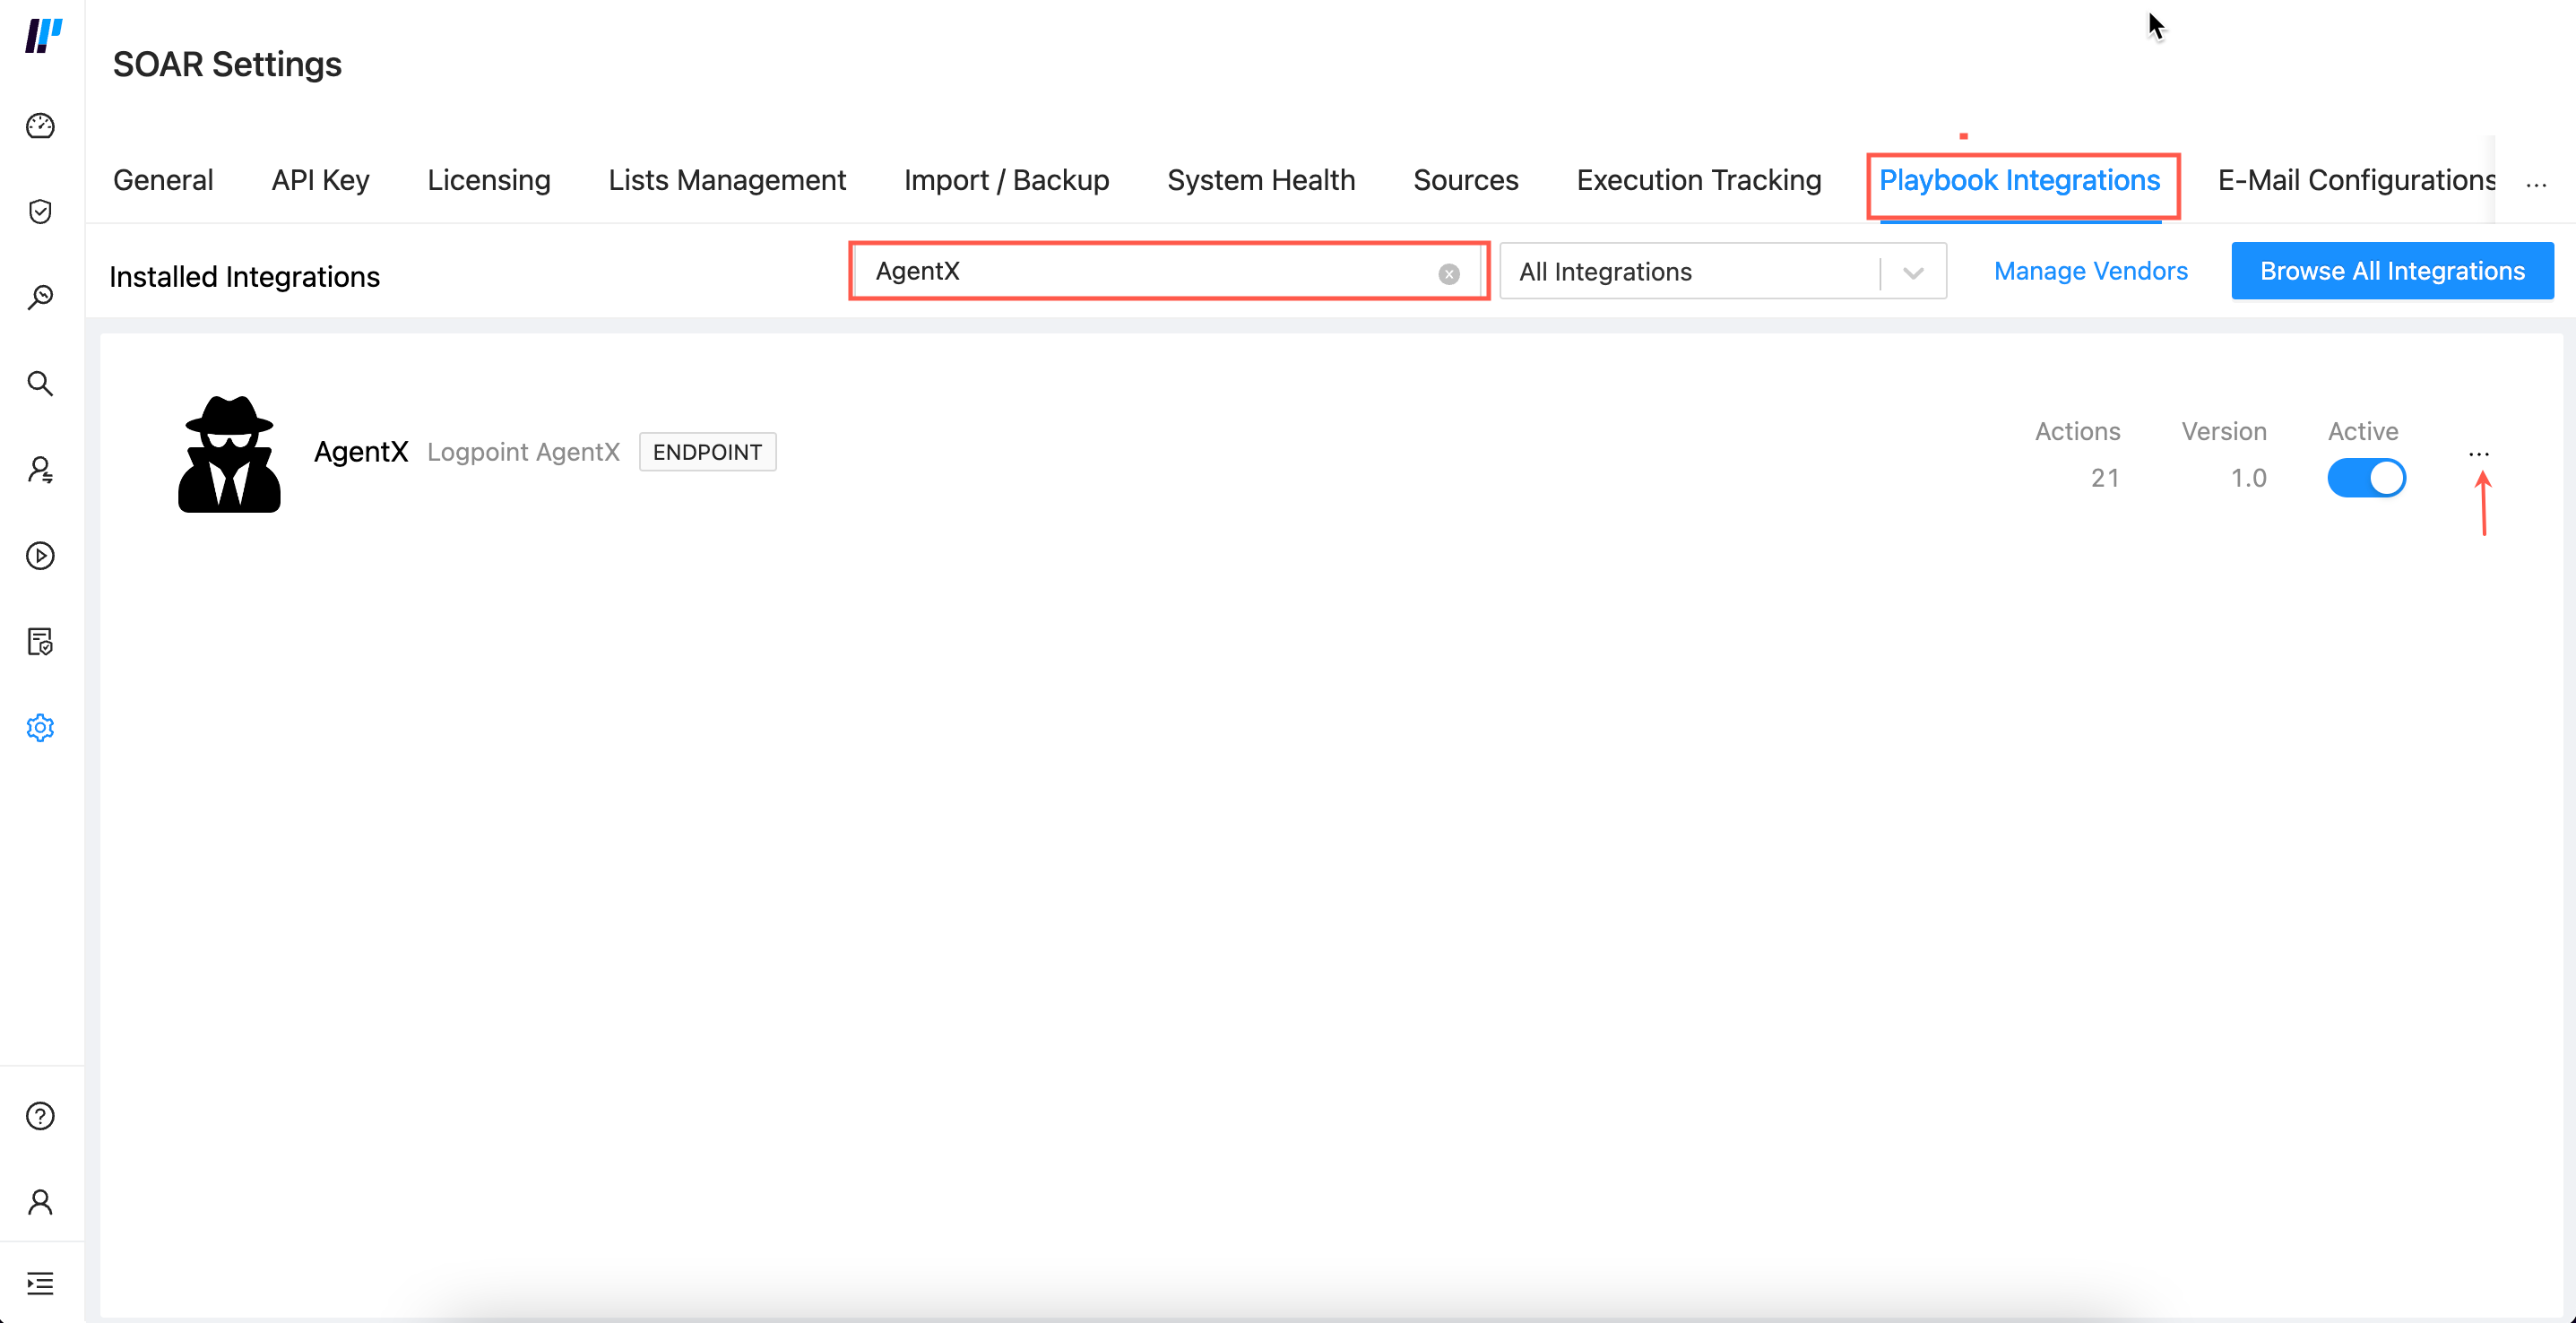
SOAR Settings
Click Configure Instance.
Enter Logpoint IP in manager_ip.
Click Save.
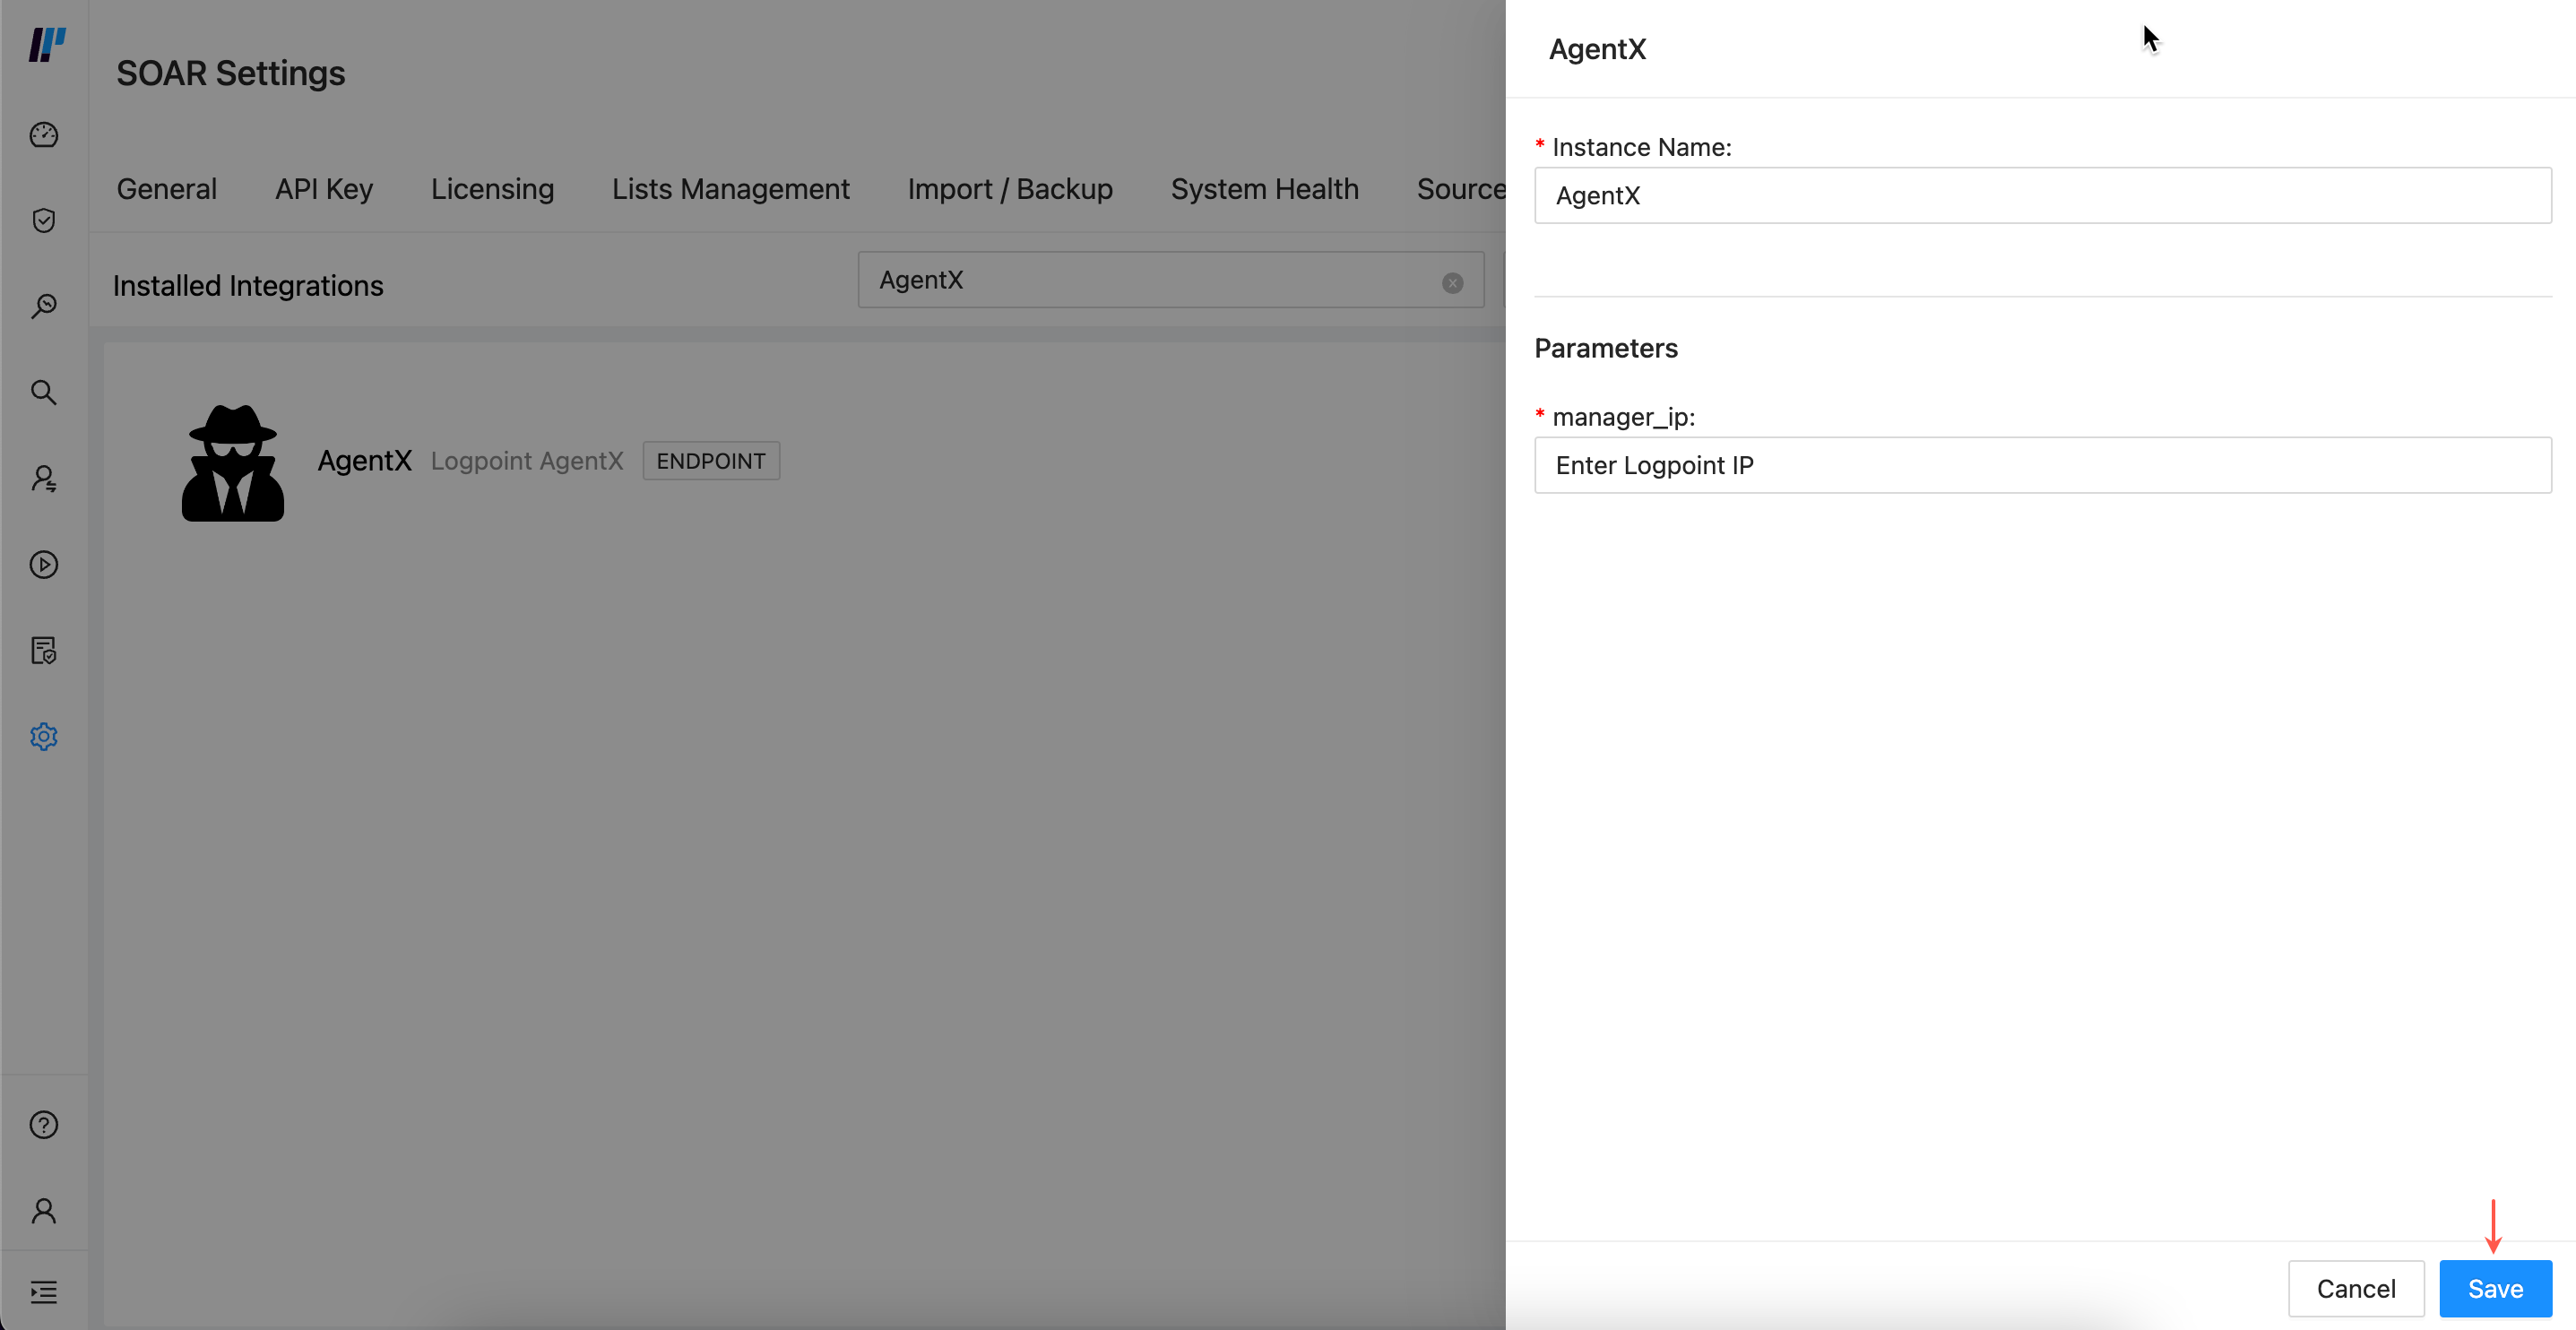
Configure Instance
For the compiled normalizers, you can select a date format by first installing CNDP and configuring it individually or collectively.
Go to Settings >> Configuration from the navigation bar and click Normalization Policies.
Click Add.
Enter a Policy Name.
Select AgentXWindowsCompiledNormalizer or AgentXUnixCompiledNormalizer.
Click Submit.
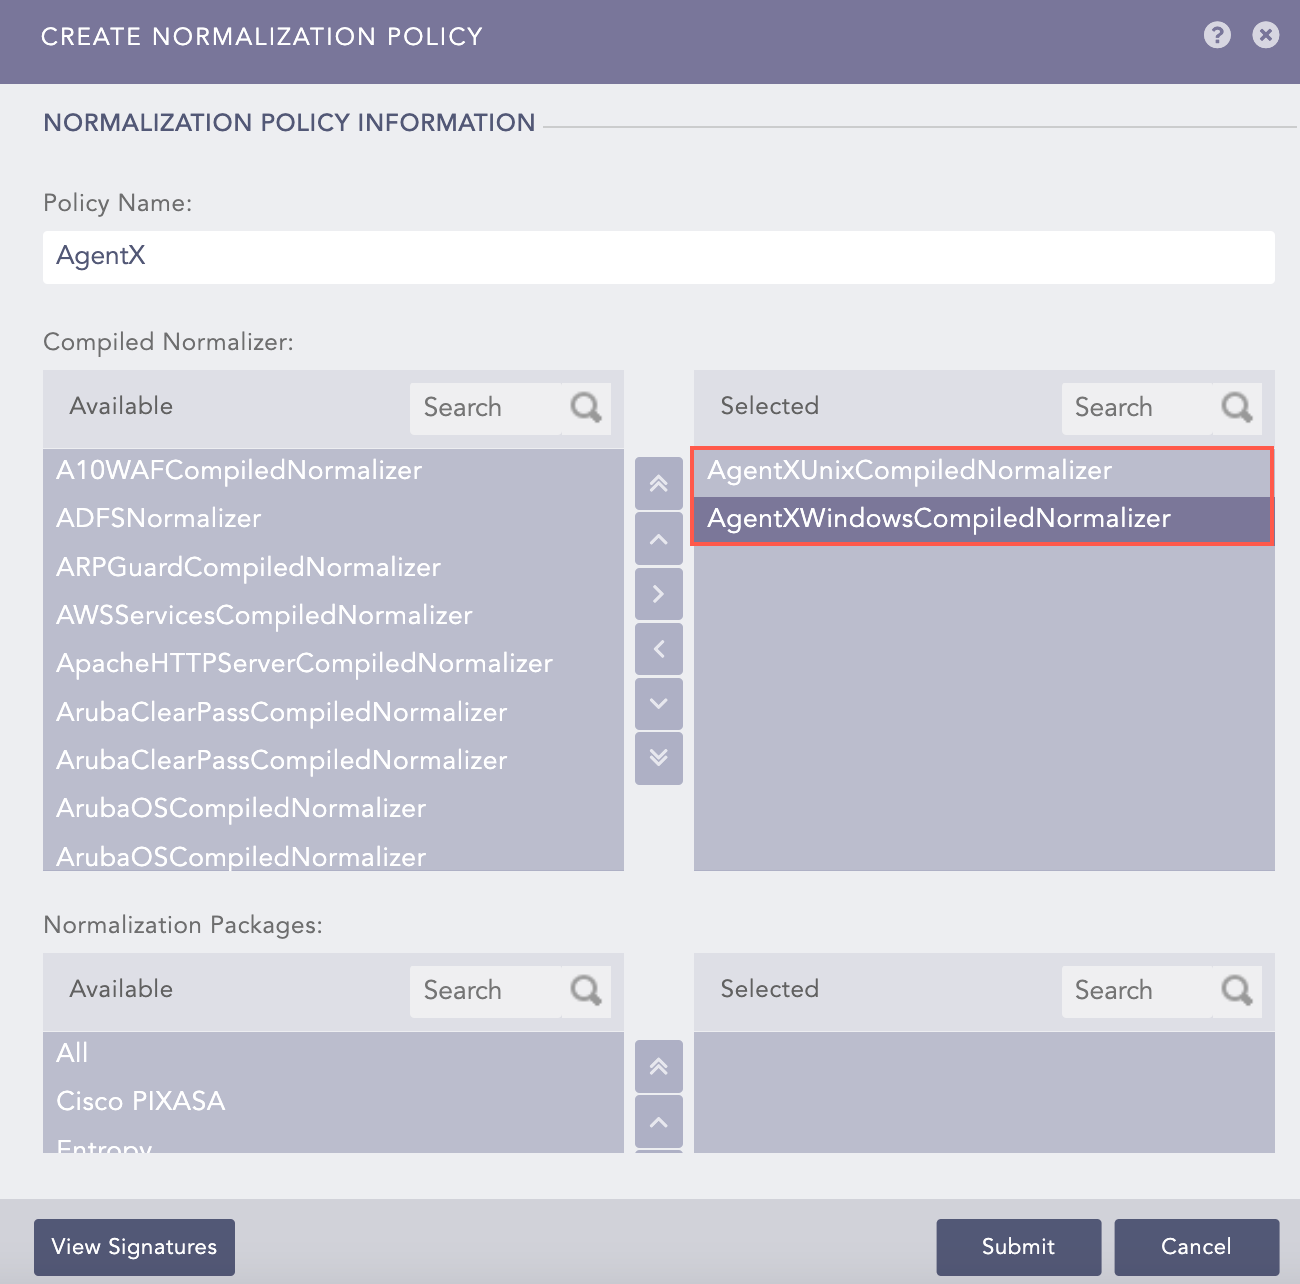
Adding a Normalization Policy
Go to Settings >> Configuration from the navigation bar and click Devices.
Click Add.
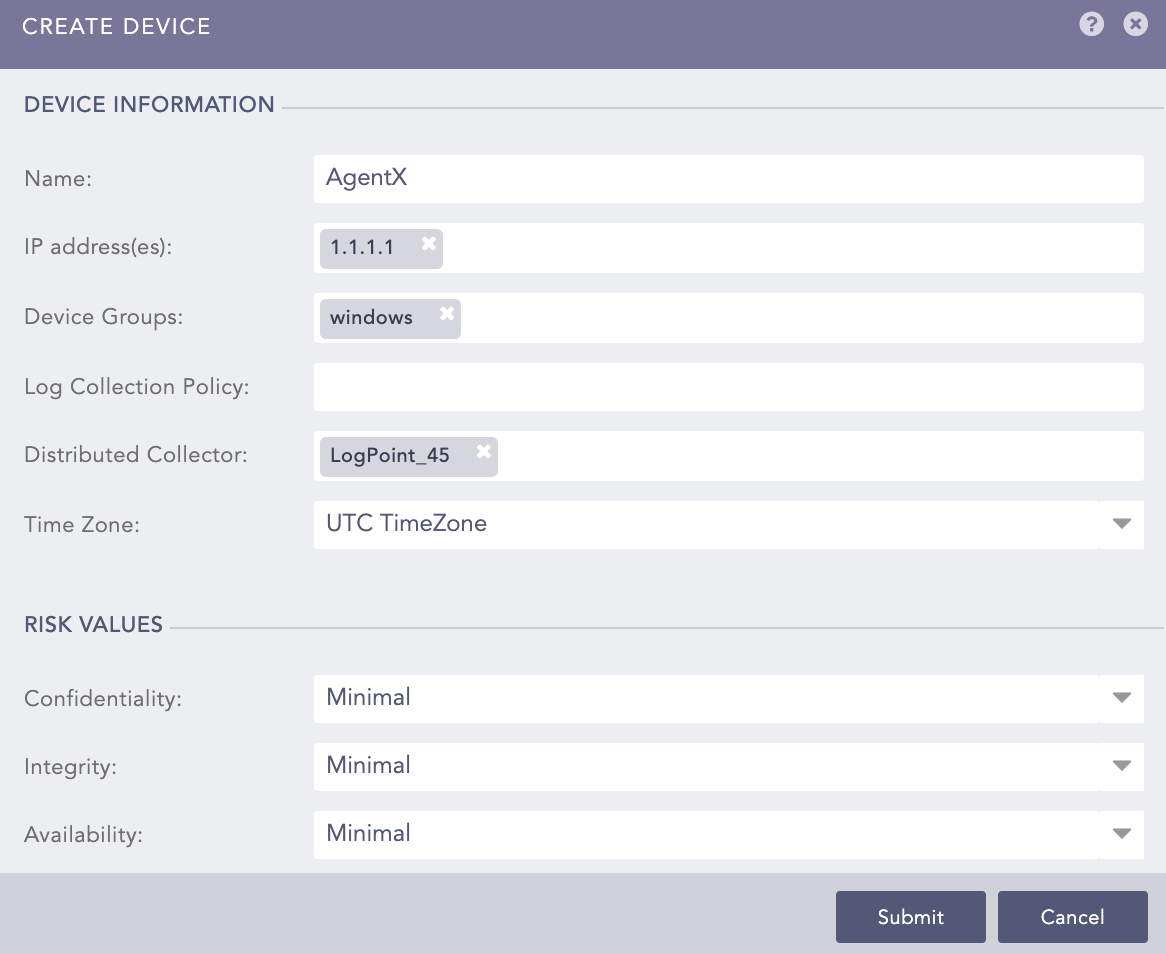
Enter your device Name and IP address(es). You must also enter load balancer IP address(es) if you are implementing it with AgentX Cluster.
Select the Device Groups.
Select an appropriate Log Collection Policy for the logs.
Select a collector or a forwarder from the Distributed Collector drop-down menu.
Select a Time Zone from the drop-down menu.
Note
The time zone of the device must be the same as the Windows or Linux device.
Configure the Risk Values for Confidentiality, Integrity and Availability. These values are used to calculate the risk levels of the alerts generated from the device.
Click Submit.
Adding a Device in Logpoint
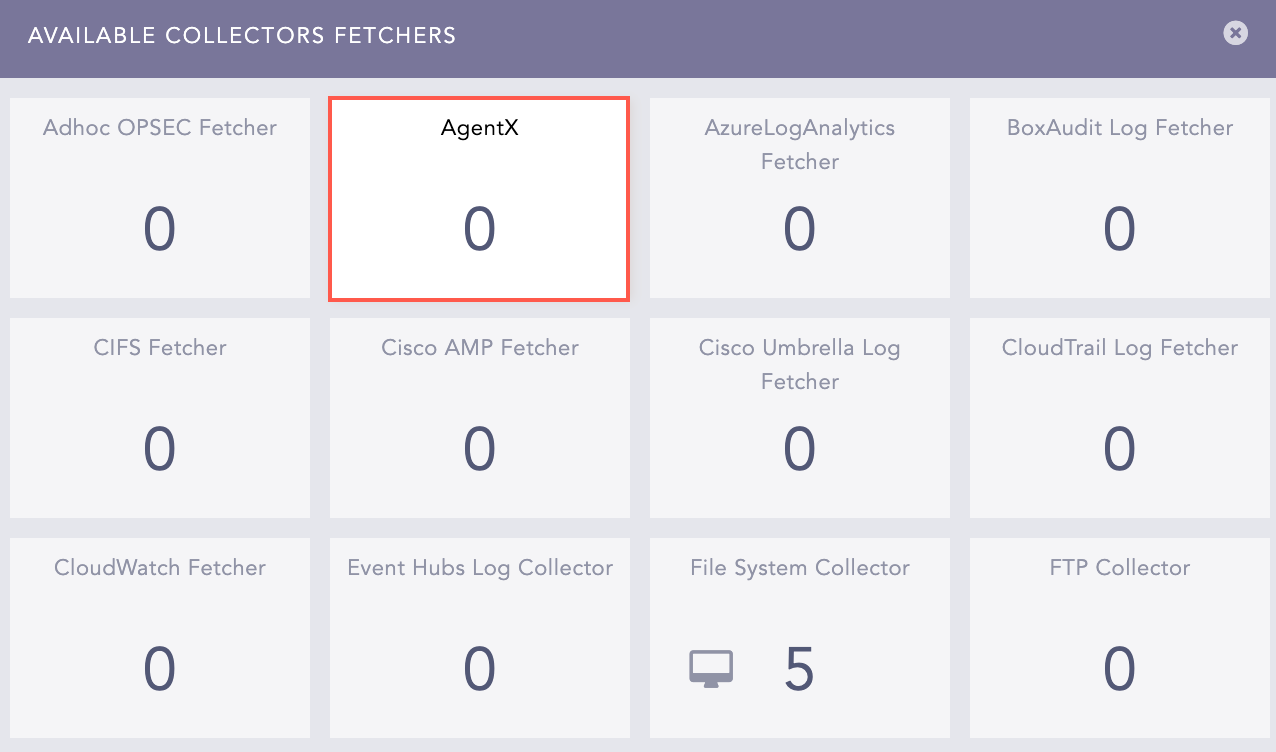
Go to Settings >> Configuration from the navigation bar and click Devices.
Click the Add Collectors/Fetchers ( ) icon under Actions of the added Windows or Linux device.
Click AgentX.
AgentX
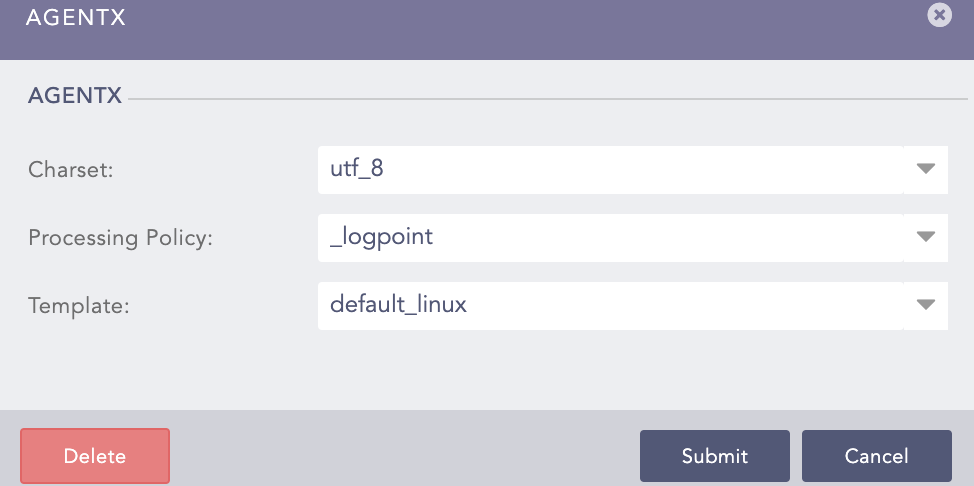
Select the Charset.
Select a Processing Policy that uses the previously created normalization policy.
Select the previously created Template or a default template to add configurations in Logpoint AgentX Manager. If you select None, you must create a Template by clicking Yes.
Click Submit.
AgentX